Abstract: This article will introduce how to use the Intellij and command to follow squash and rebase to resolve PR feature branch conflictions and make the project git history clean. This operation is used by most Open Source project to improve the collaboration among all the developers.
Introduction
There are two usages for rebase:
- when you want to merge feature branch to master and there are some conflictions.
- when you want to make your feature branch based the lastest master to get new supports.
We can use merge to get the same result (merge master to feature) but it will mess the git history. So rebase is a better solution than merge for collaboration in git project which is also used in most of the open-source projects such as GitLab.
There is one existing blog article to discuss the pros and cons of rebased and the pros significantly outweigh the cons, so I suggest to use rebase in your team.
There is another problem for rebase is the conflicts should be resolved between the target branch with each commit in current branch. So if the feature branch has multiple commits have conflicts with the master branch, you need to resolve multiple times even you have resolved some conflicts in the latest commits of your feature.
For example, there are 3 commits in your feature branch, you first commit has conflicts with the master branch and then you second commit just resolves these conflicts. But if you rebase your feature branch to master directly, you must resolve the conflicts of the first commit even it has been resolved by further commits.
How to use the code sample
Before you start to apply this workflow on your real project, I suggest you can use the sample project to practice.
Sample Project: https://github.com/xinatcg/git-master
You can fork it to your account and clone it to local. Please make sure the status should be as follow to simulate the scenario:
- working on feature branch
feat/squash-rebase - has the corresponding PR on GitHub
- master branch is updated by other developers and should be same with
checkpoint-master - working feature branch has confliction with the master branch and should be same with
checkpoint-feat
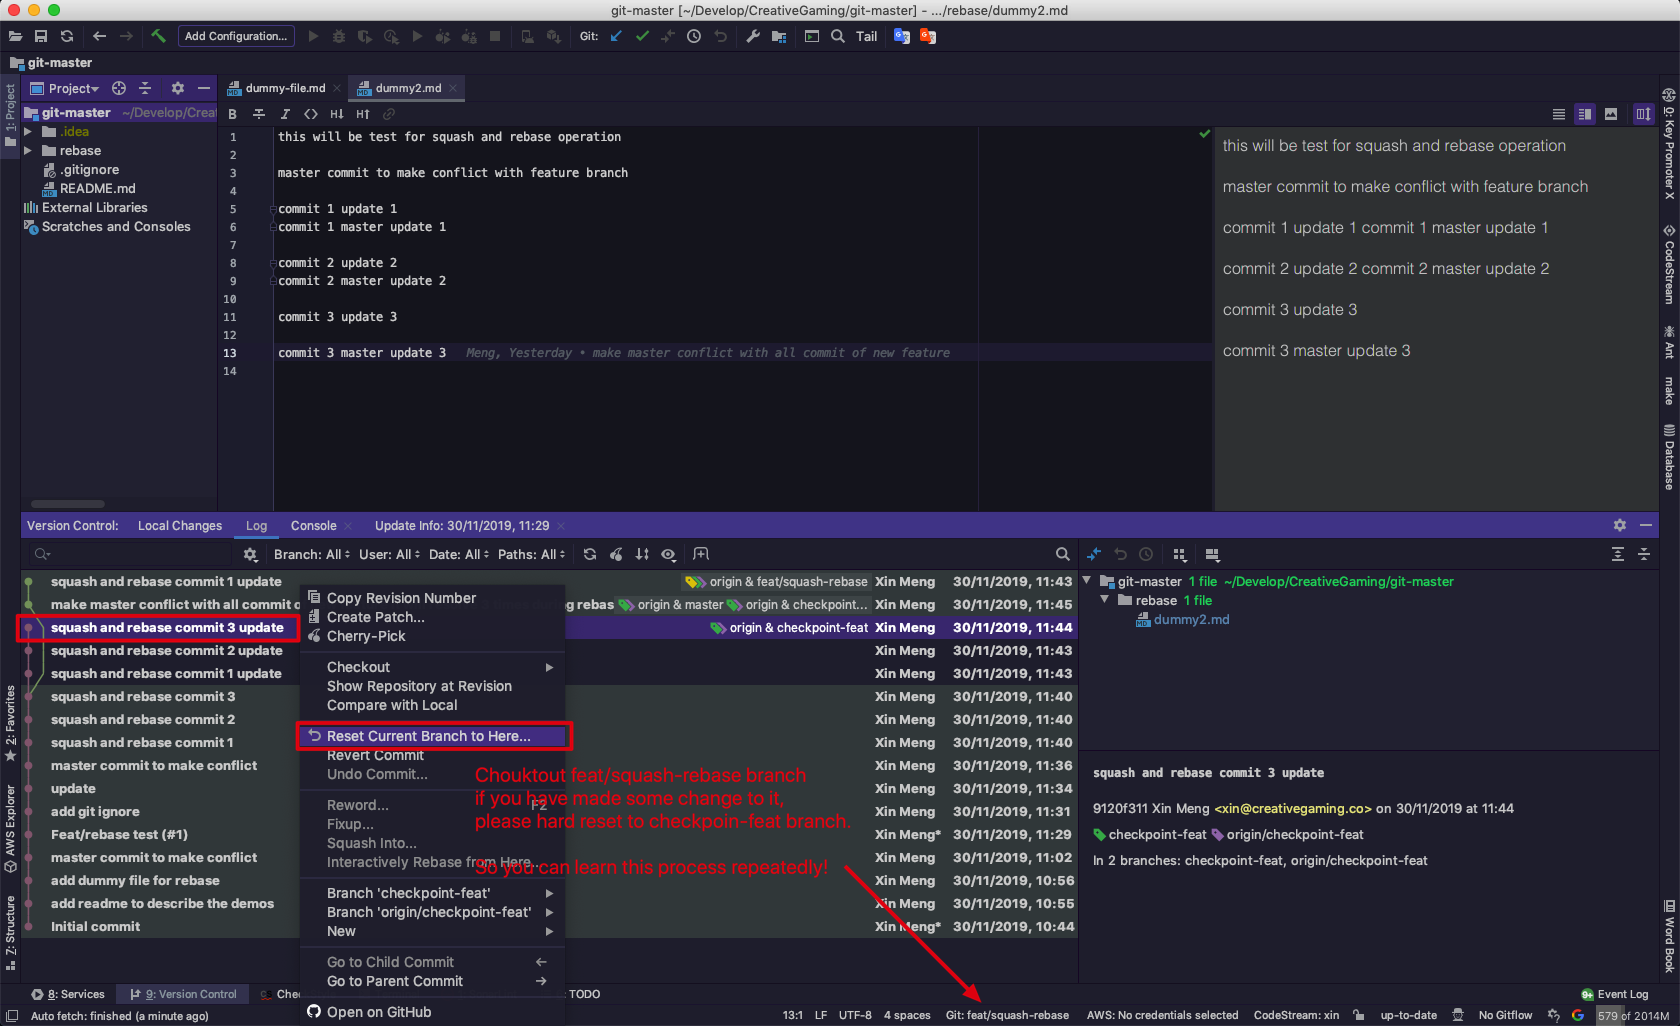
You can hard reset the feat/squash-rebase to checkpoint-feat HEAD to practice repeatedly.
Check Status
After check the current status, we can find that during we are working on our feat\squash-rebase branch, some other developers make some commits to master. Meanwhile, there are some conflicts between the latest master with the feat\squash-rebase branch.
In the same time, the feat\squash-rebase branch needs some features from the latest master branch such as some utility functions. So rebase my current feat\squash-rebase branch onto the latest master branch is one of the best choices.
Squash
To prevent to resolve several conflicts during rebase process, we’d better to squash our current feat\squash-rebase branch from multiple commits to a single commit.
There are two methods to achieve this target:
- Rebase to the starting point of feat branch (the commit checkout the feat branch from the
master). During the rebase process, you need to pick first commit and squash all other commits. - Soft reset the head to the starting point of feat branch and then make a new commit.
git reset --soft $(git merge-base HEAD master) && git commit --reuse-message=HEAD@{1}
The command above just keep the first commit message.
The second method is not good because you need to provide new commit message --reuse-message=xxxx to include all the commits history by yourself. But the first solution the rebase process can handle it for you. So we suggest the first solution.
Now let me introduce this workflow by using Intellij and Git bash command line.
Using Intellij Rebase and Squash
We use IntelliJ to process this workflow step by step.
1. Check initial status
Before you start to practice this tutorial, make sure you git status should be as follow:
- feat branch has several commits (
feat\squash-rebaseatcheckpoint-feat) - master has new commit after feat start point (
masteratcheckpoint-master)
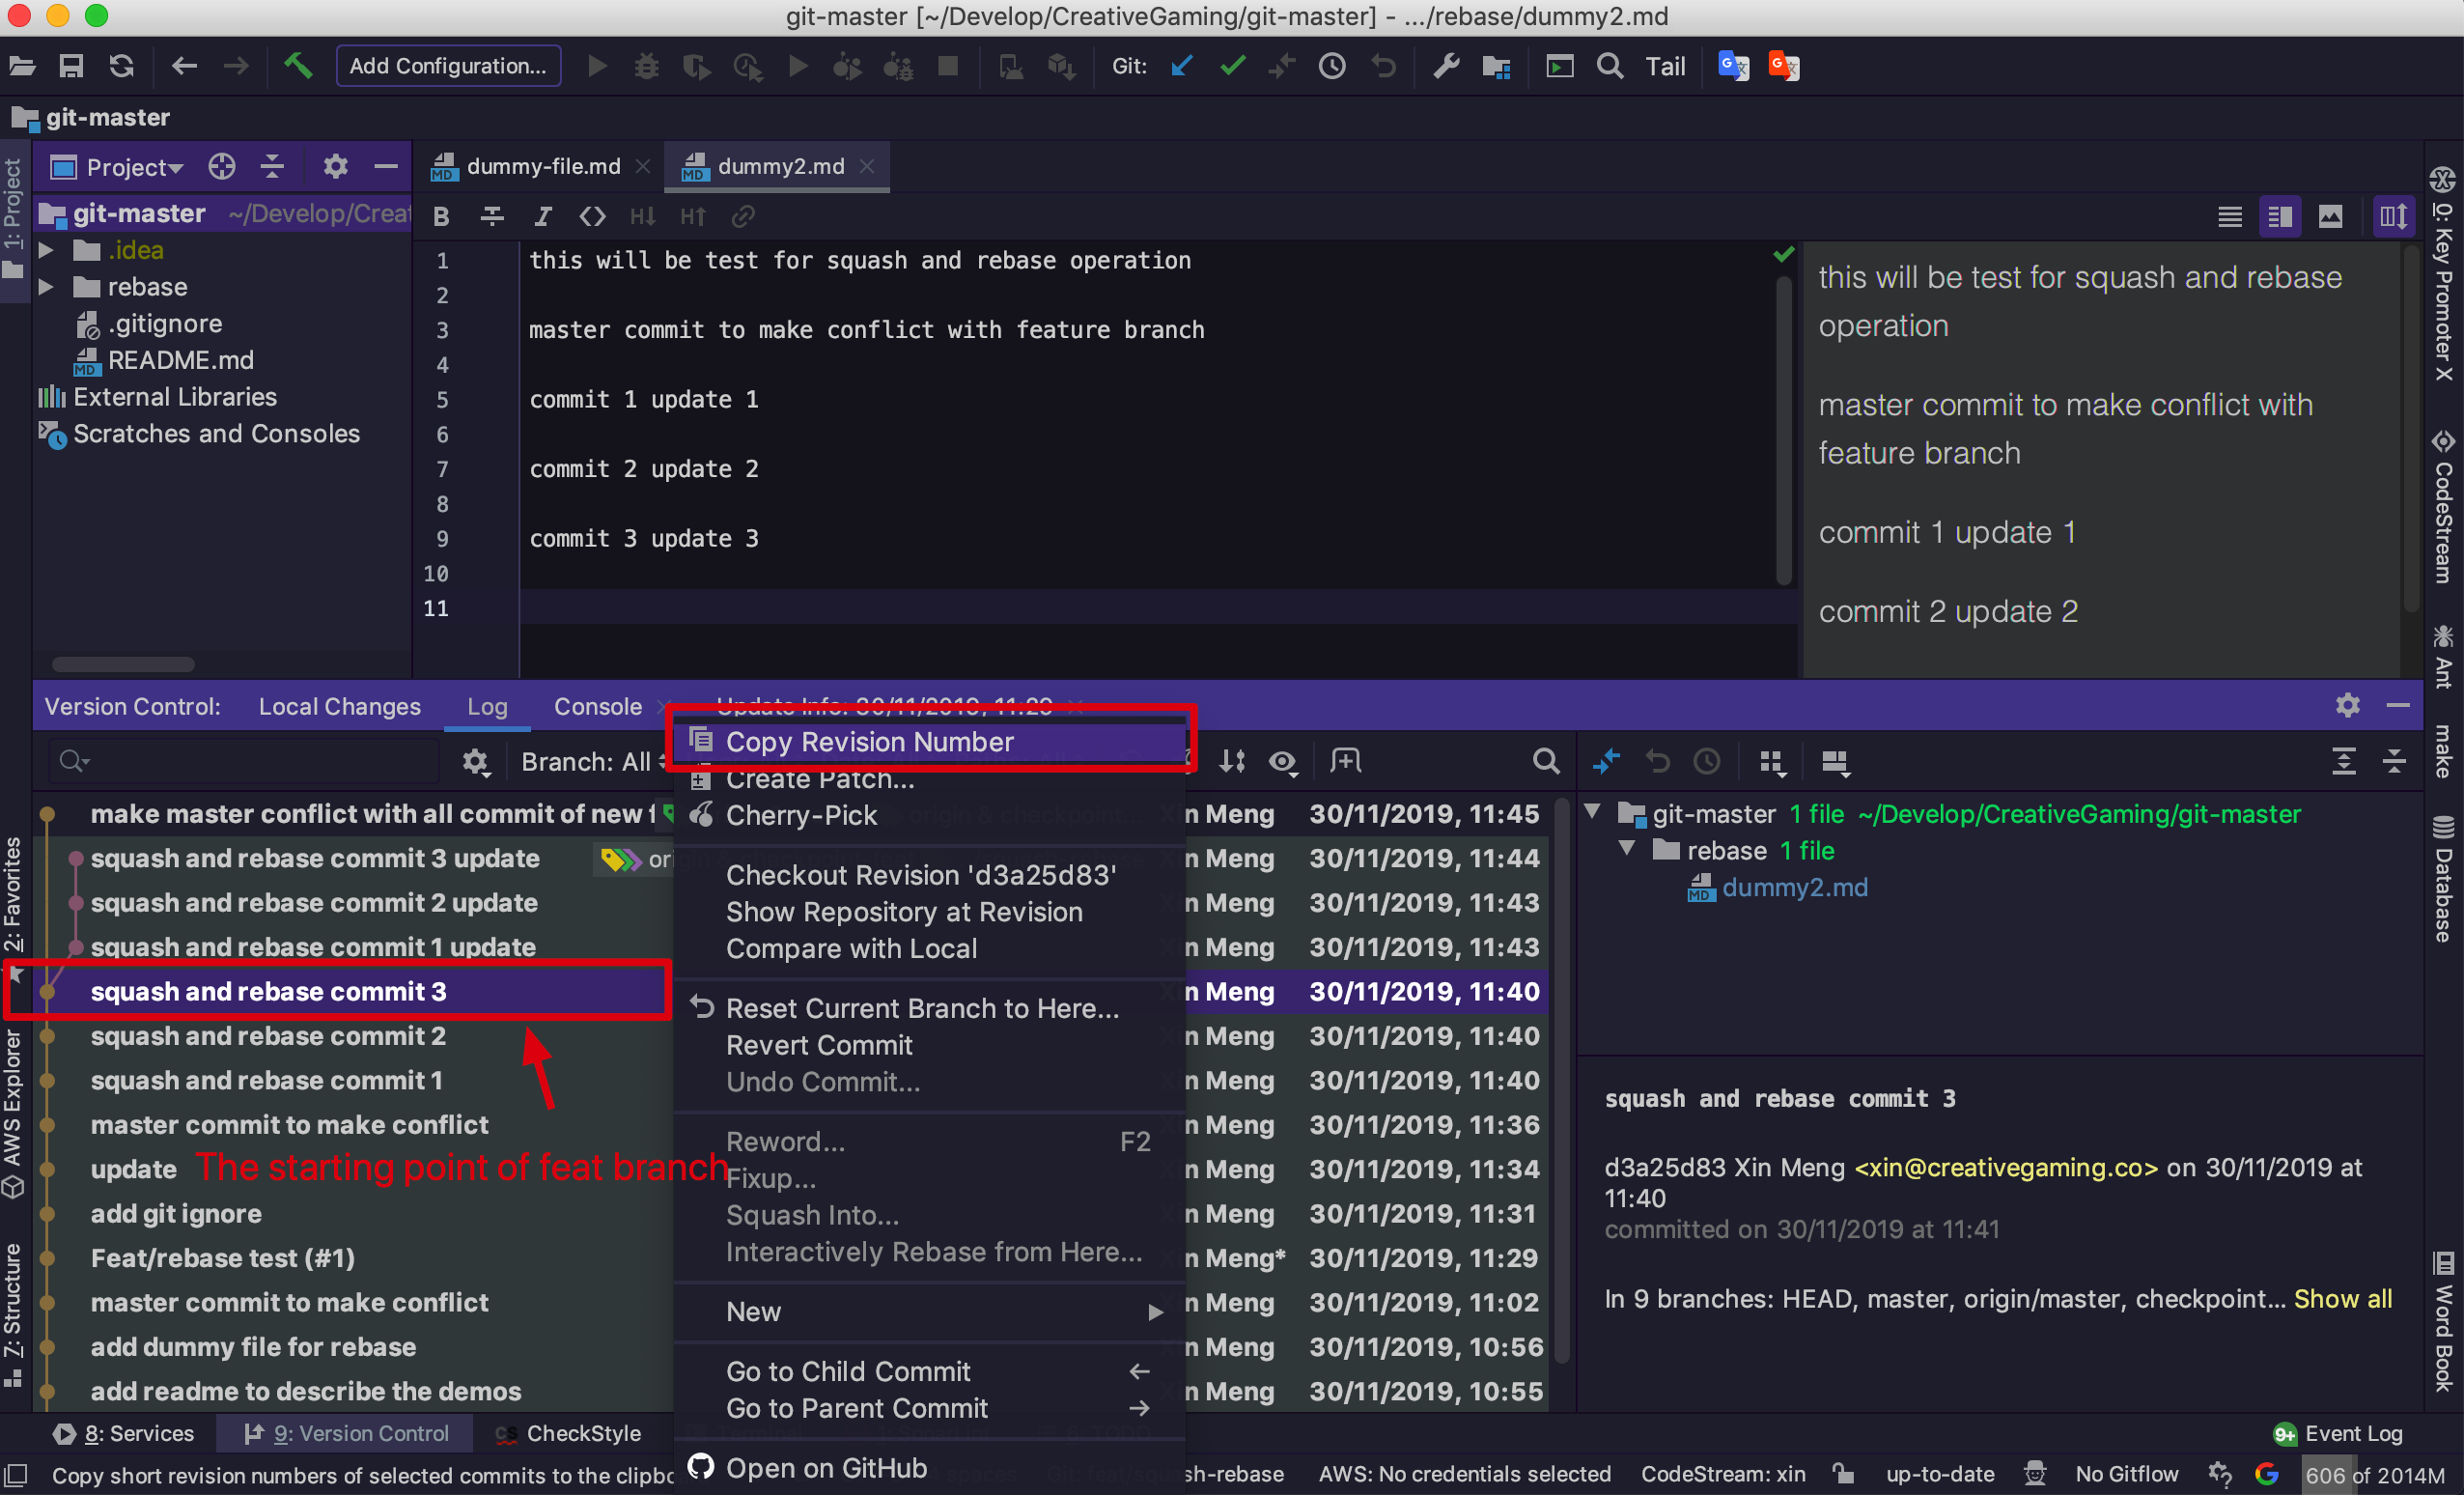
2. Copy revision commit of feat root
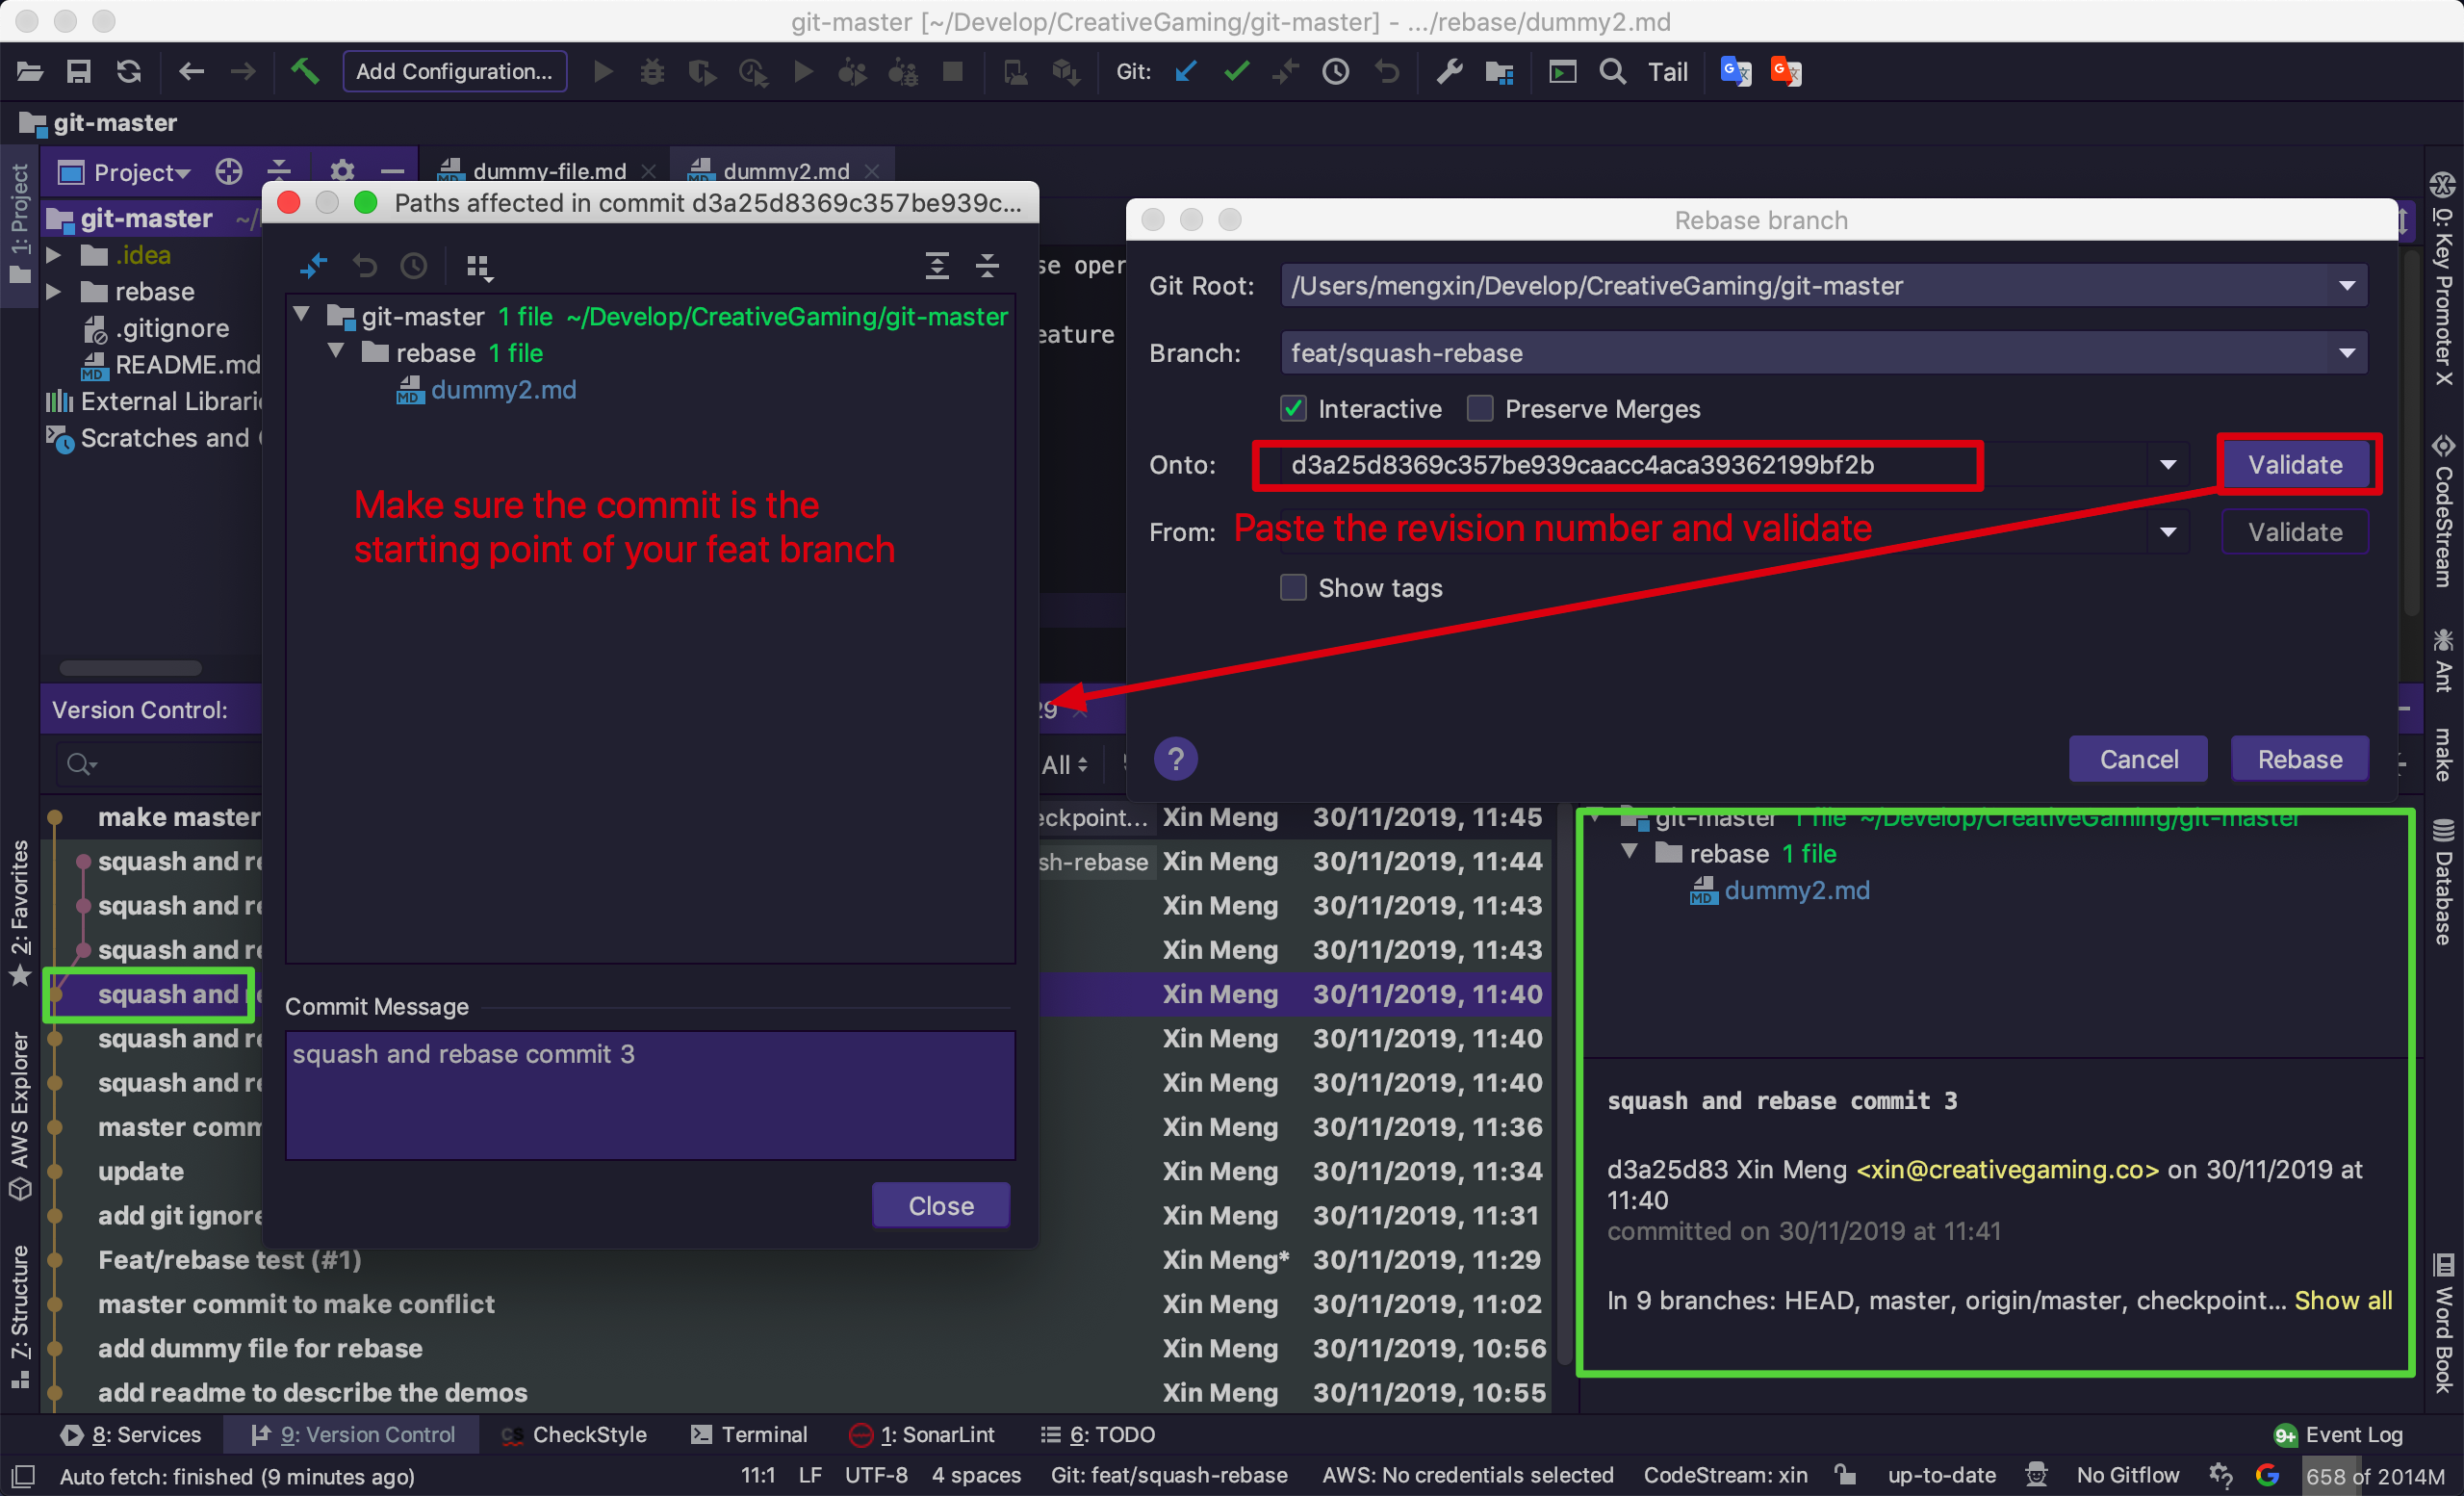
First, we name the starting commit point of feat branch as feat root which means the feat branch start from this point on the master branch. It should be a split-off point between feat and master.
The reason we copy this revision commit number: there is no branch to indicate this commit, so we need to use this number to find the corresponding commit.
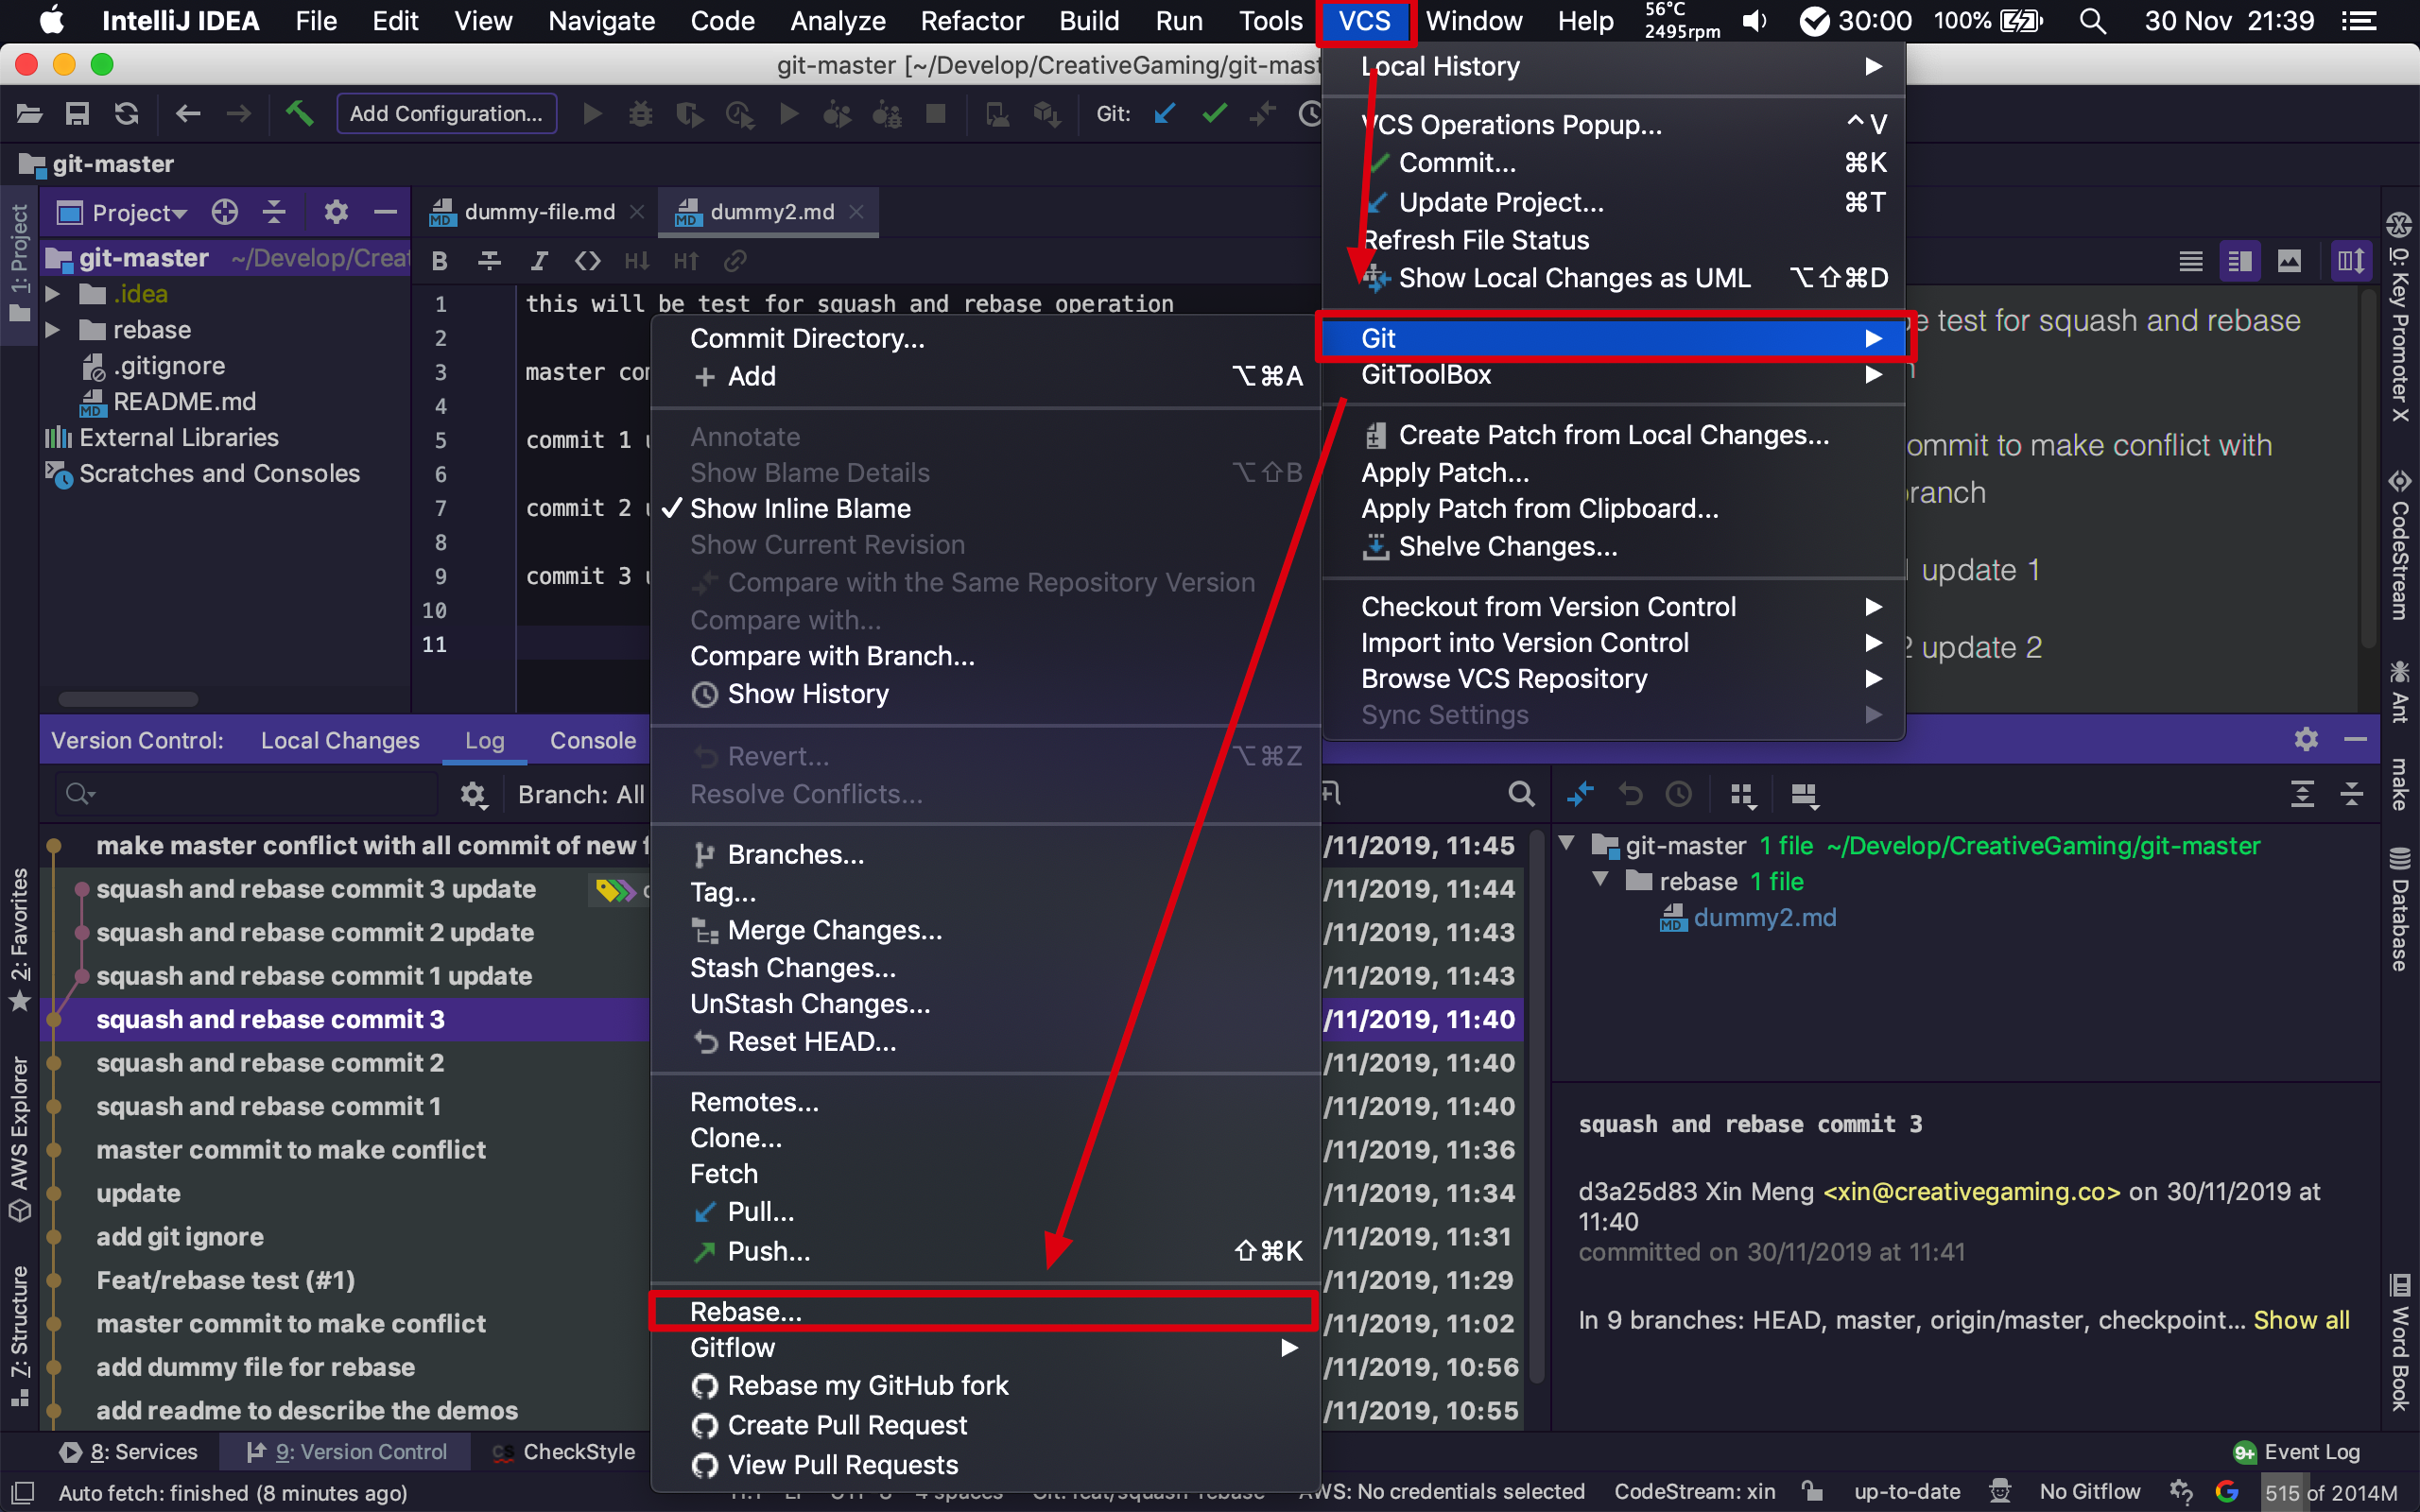
3. Start to rebase from the menu
We can start rebase from the Menu: VCS->Git->Rebase….
The objective of this Rebase is squashing the feat branch and we can know that squash is just one of choice of rebasing process.
4. Configure rebase
Before start the interactive rebase process, we need to configure the rebase, there are several important configurations:
- Branch: this is the current working branch which you want to rebase
- Onto: this is the target commit/branch you to rebase current branch onto.
- Interactive: this is the option to enable interactive process
We should paste the Commit Revision number we copy in Step 2 and click the Validate to double-check whether it is the feat root. After confirmation, click Rebase button to start the interactive process of rebasing.
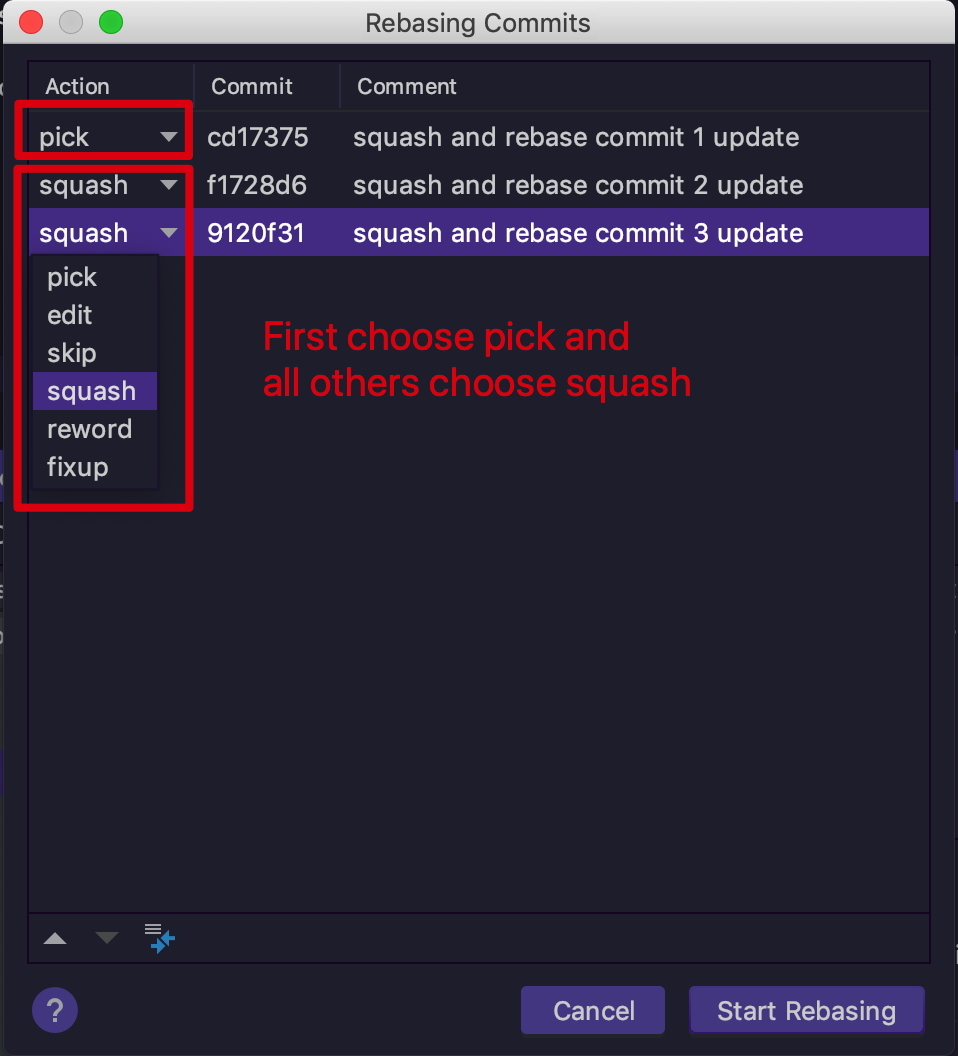
5. Rebase interactive process
If you have multiple commits between you HEAD of the feat branch and the onto commit/branch, you need to configure the action for every commit. We need to set the first commit as pick and all other commits as squash. Then the Git will pick the first commit and squash other commits into this picked commit. By using this method, we can squash multiple commits of the current feat branch into the only one commit.
After finishing the Action configuration for all the commits, click the Start Rebasing button to continue.
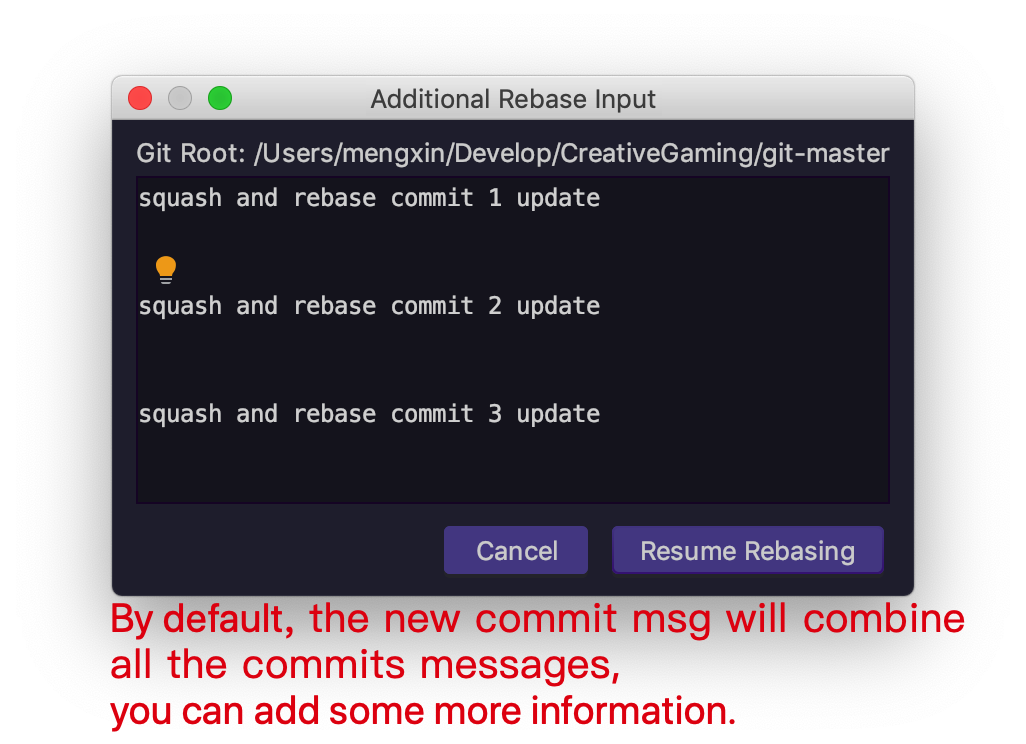
6. New commit message
After we squash all the commits into one commit, this step gives us an option to edit the commit message for this single one commit. The default message is a combination of all previous commits message and you can edit it by yourself to describe the current feat branch.
After finishing the new message, click the Resume Rebasing button to continue.
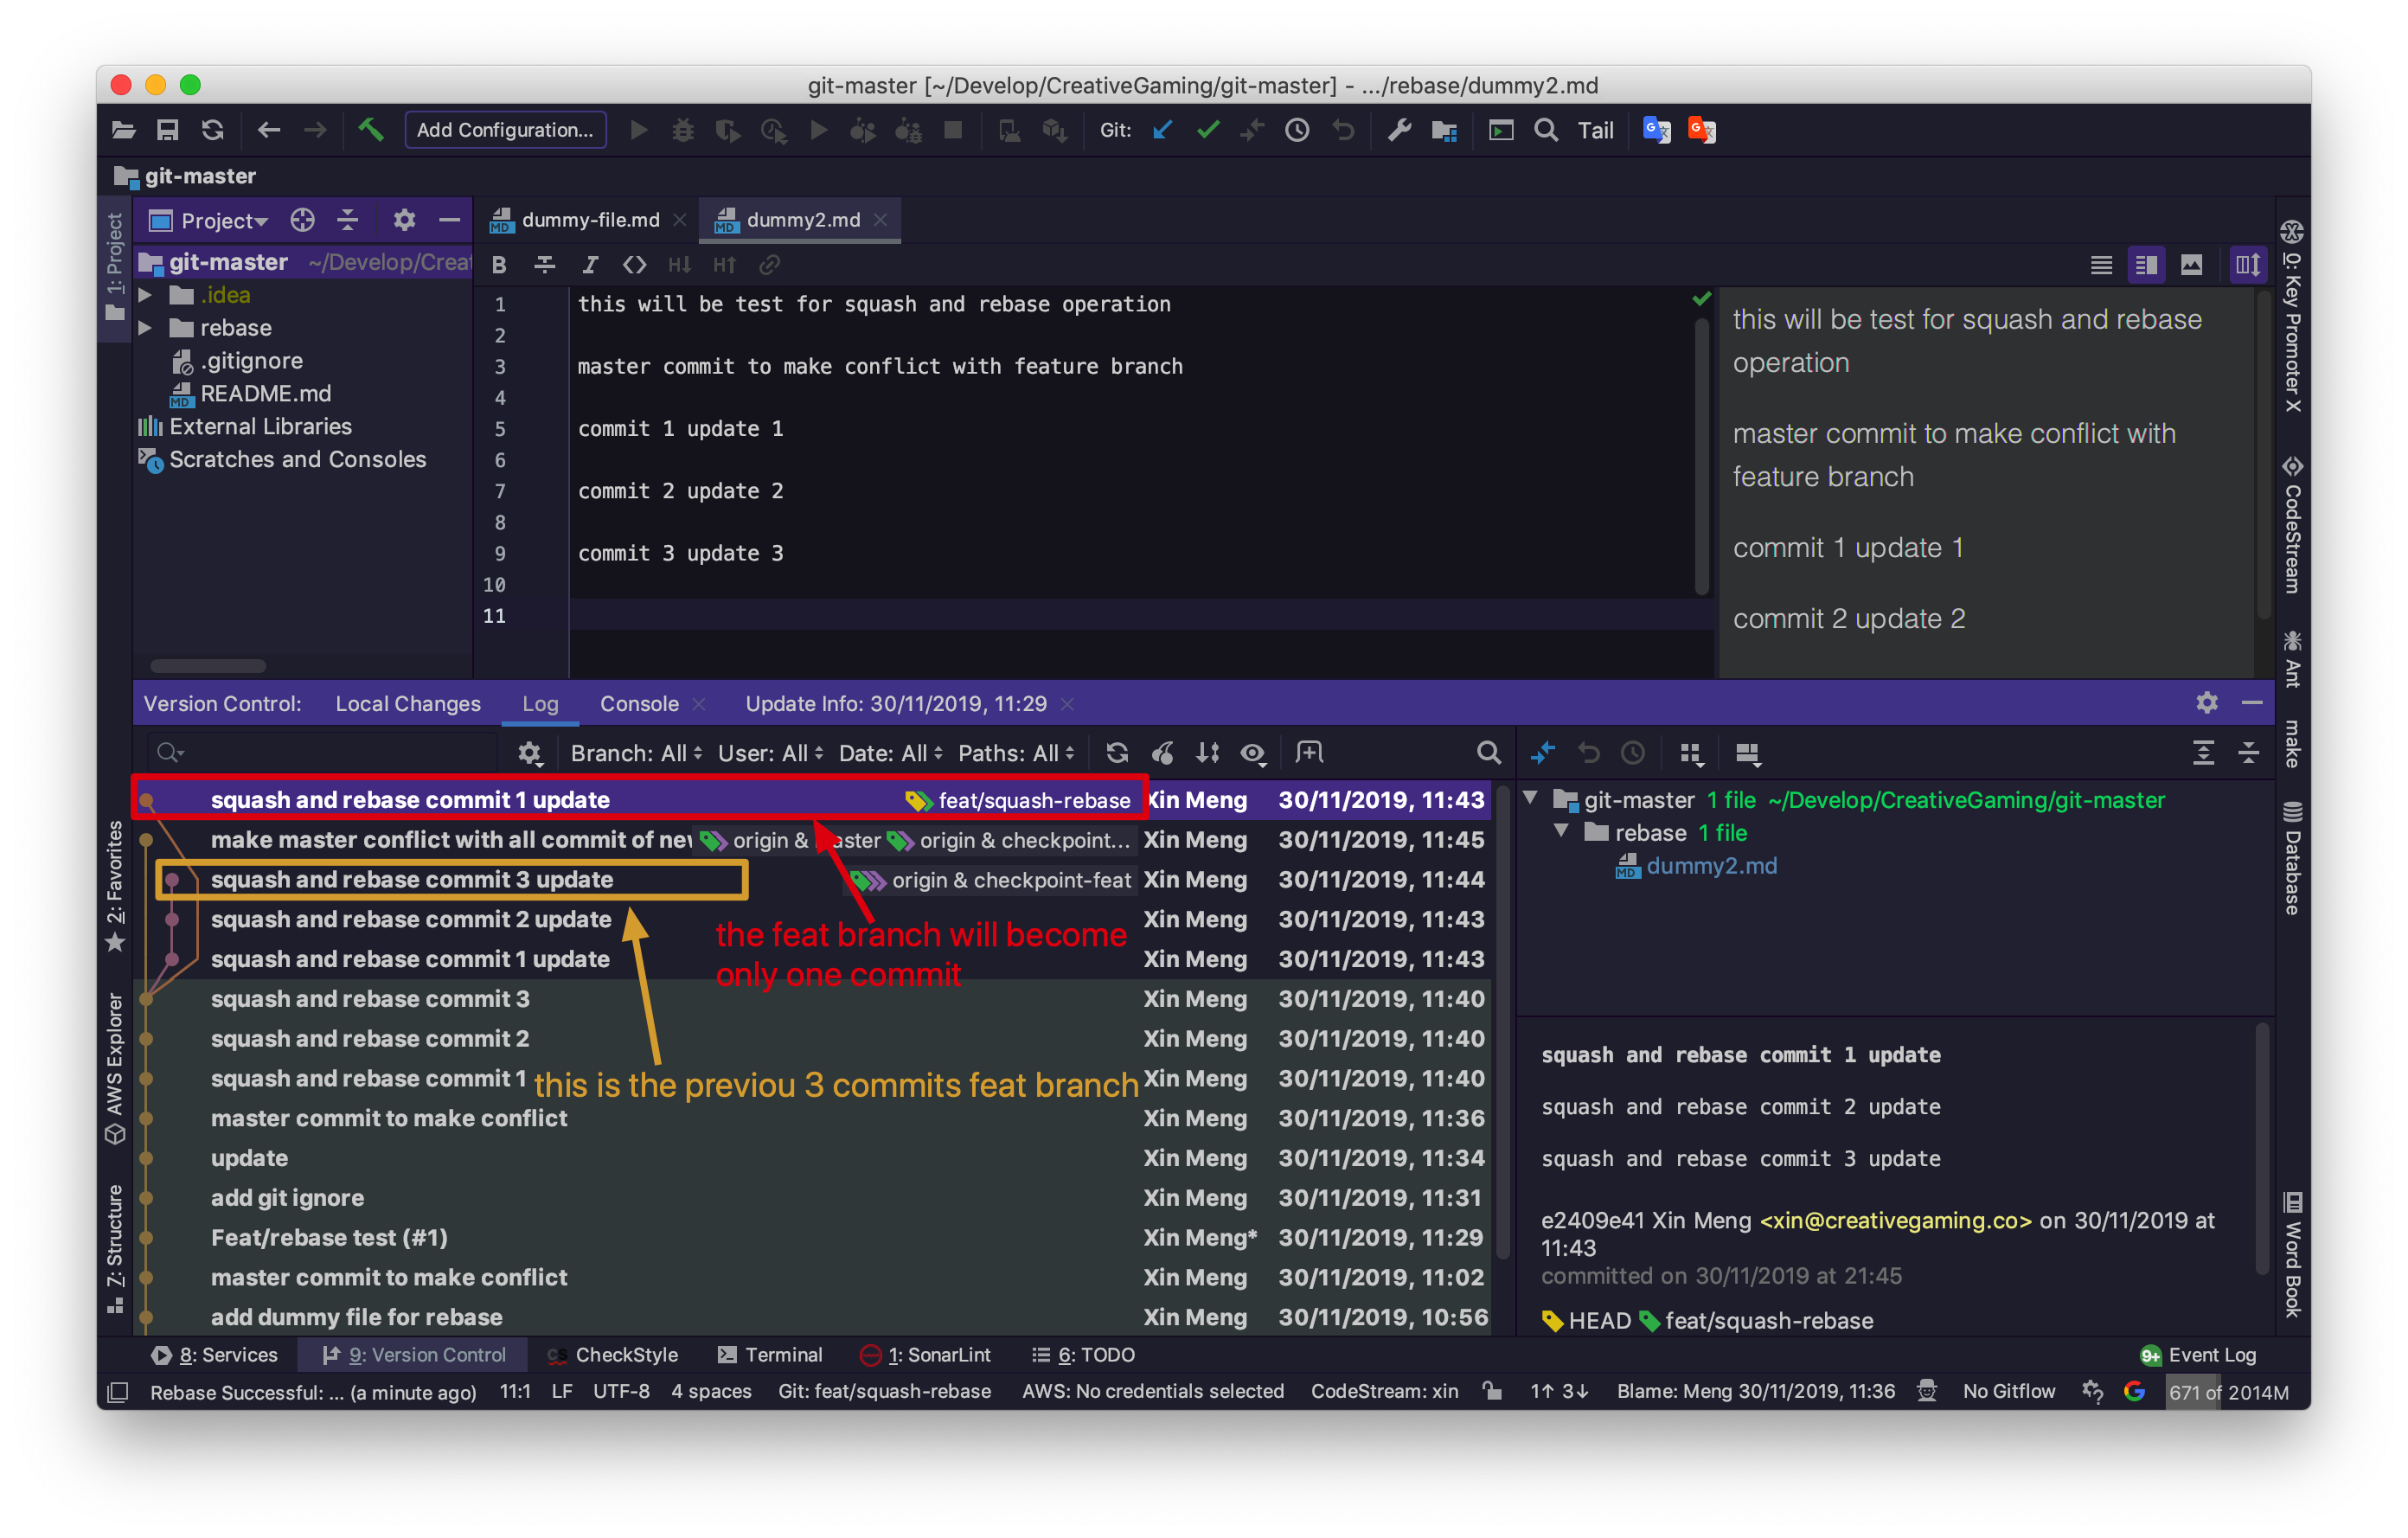
7. Squash Rebase feat branch result
Because we rebase only one branch from the HEAD to the root of the branch, so there will no conflict in the rebase process. You will get the result directly.
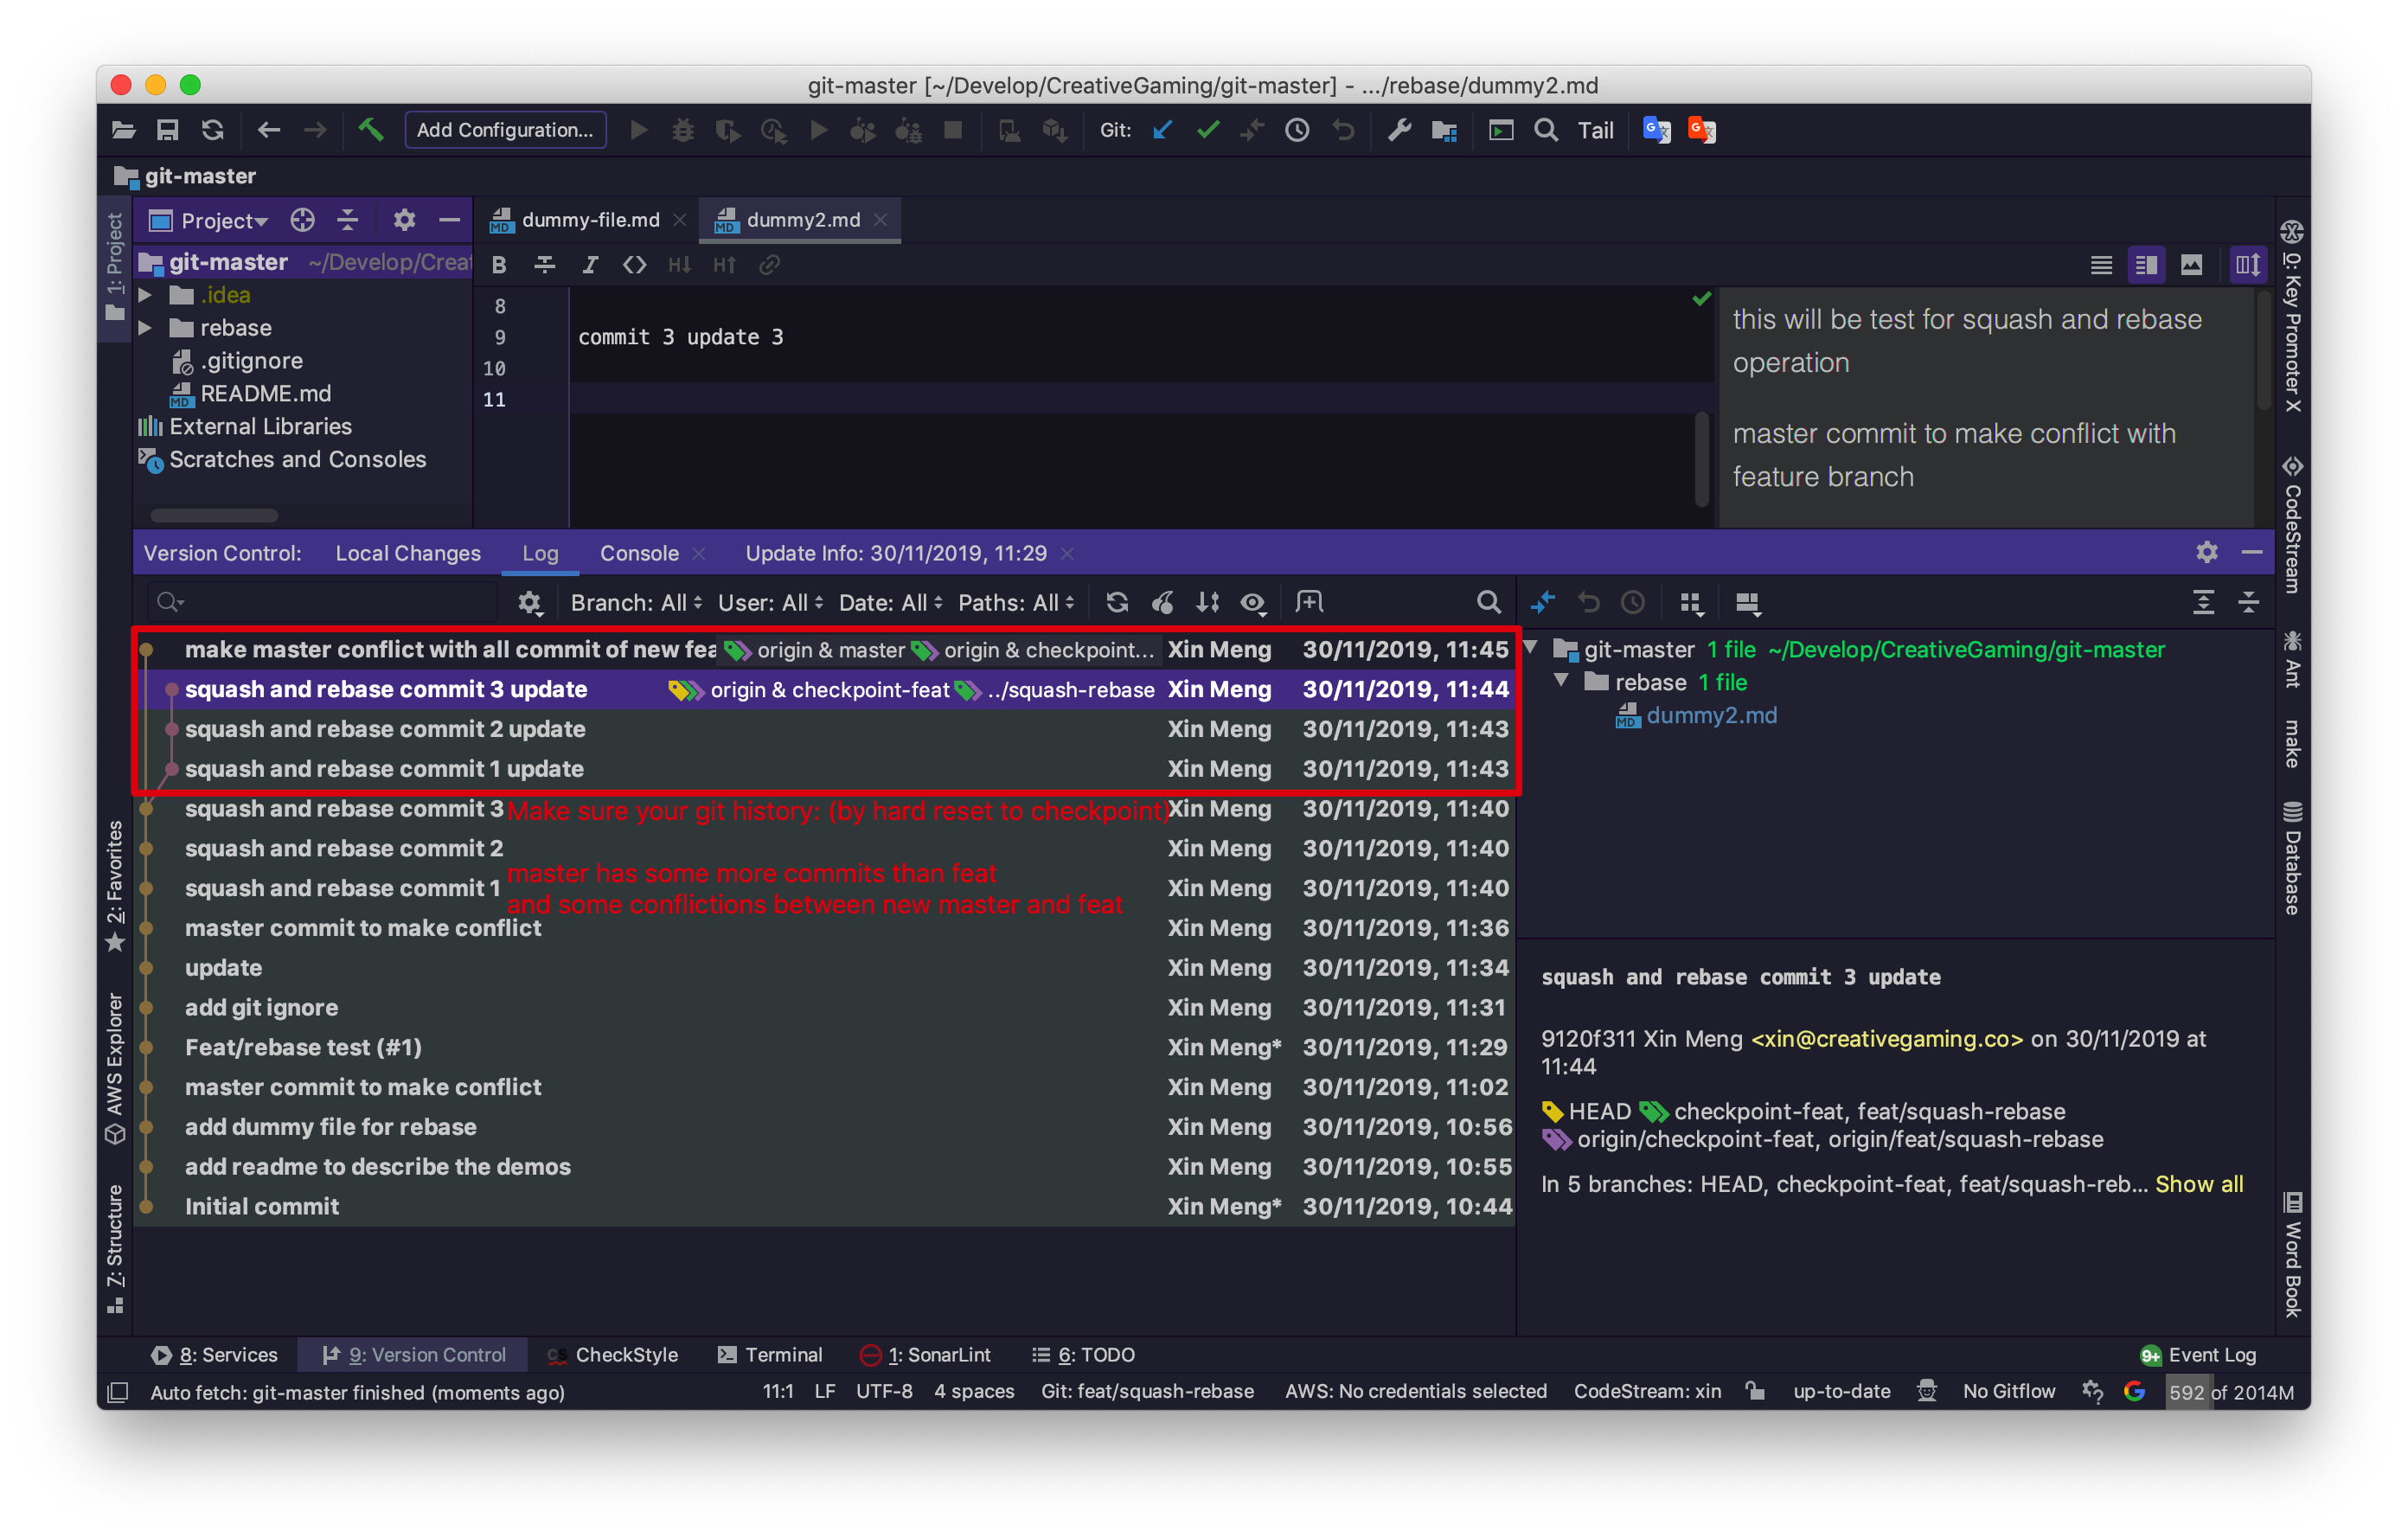
In the result, we can see the feat/squash-rebase has been changed to one commit from the feat root. We can compare it with the checkpoint-feat to see the difference.
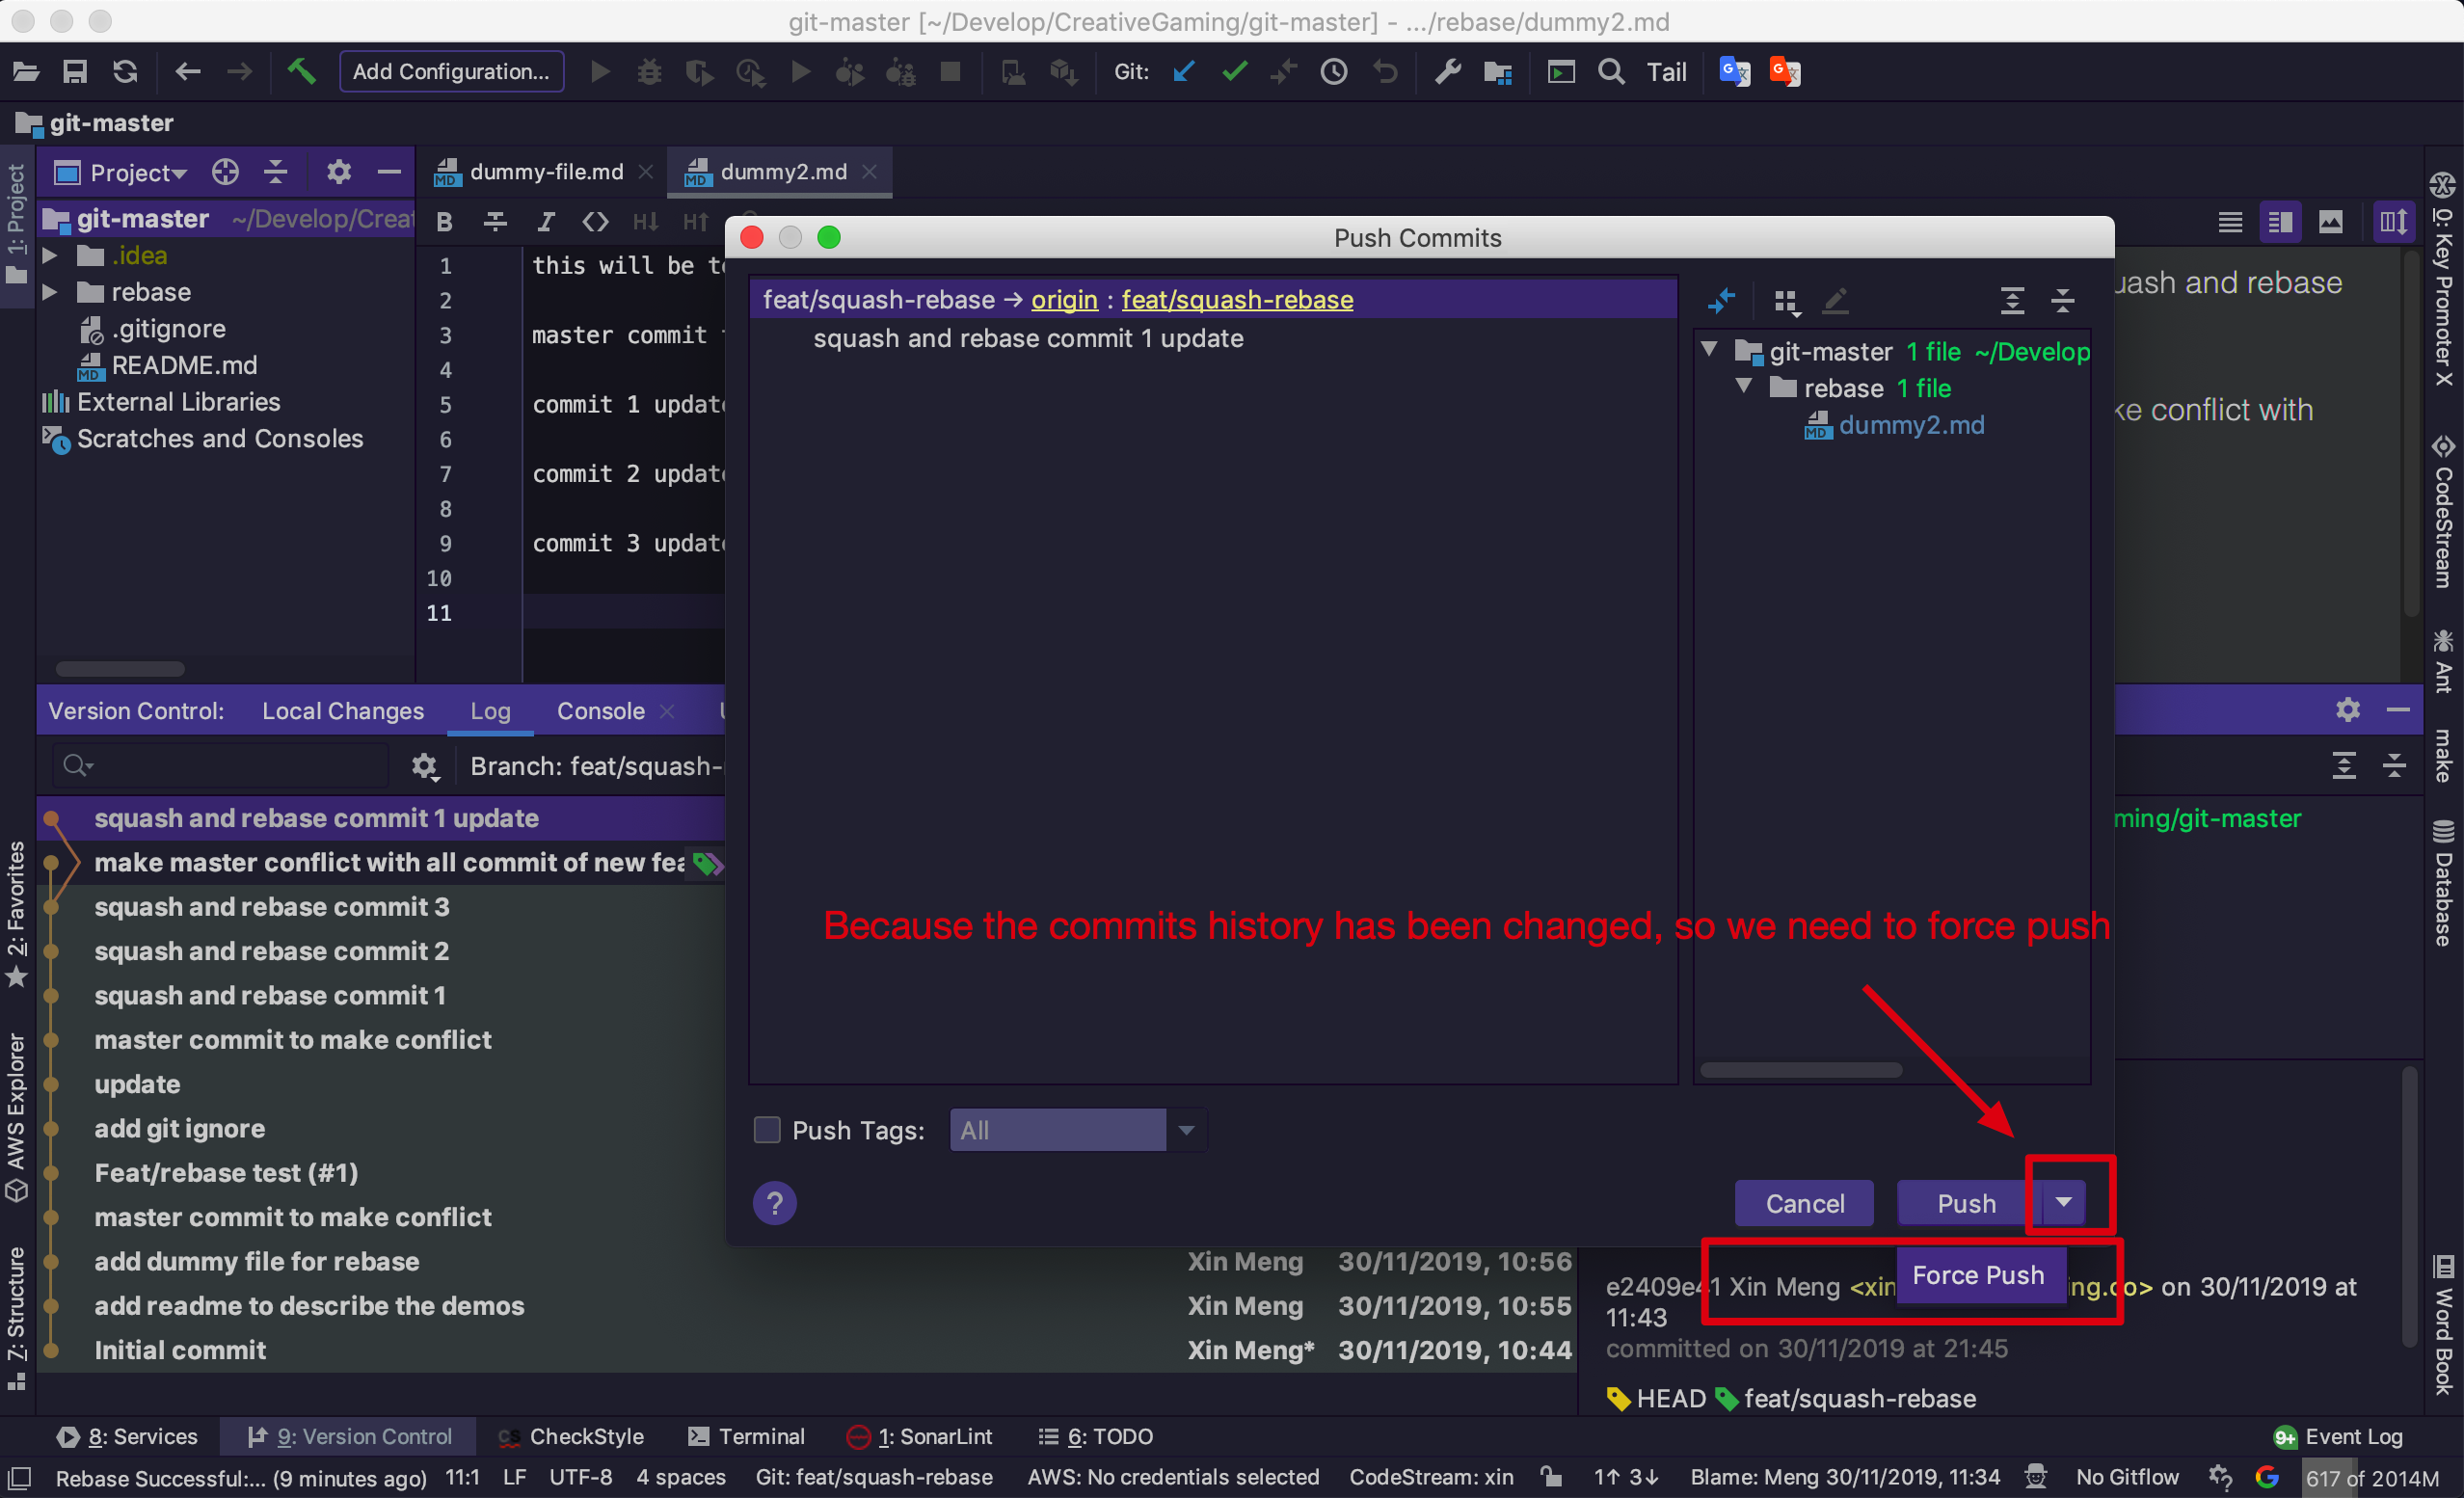
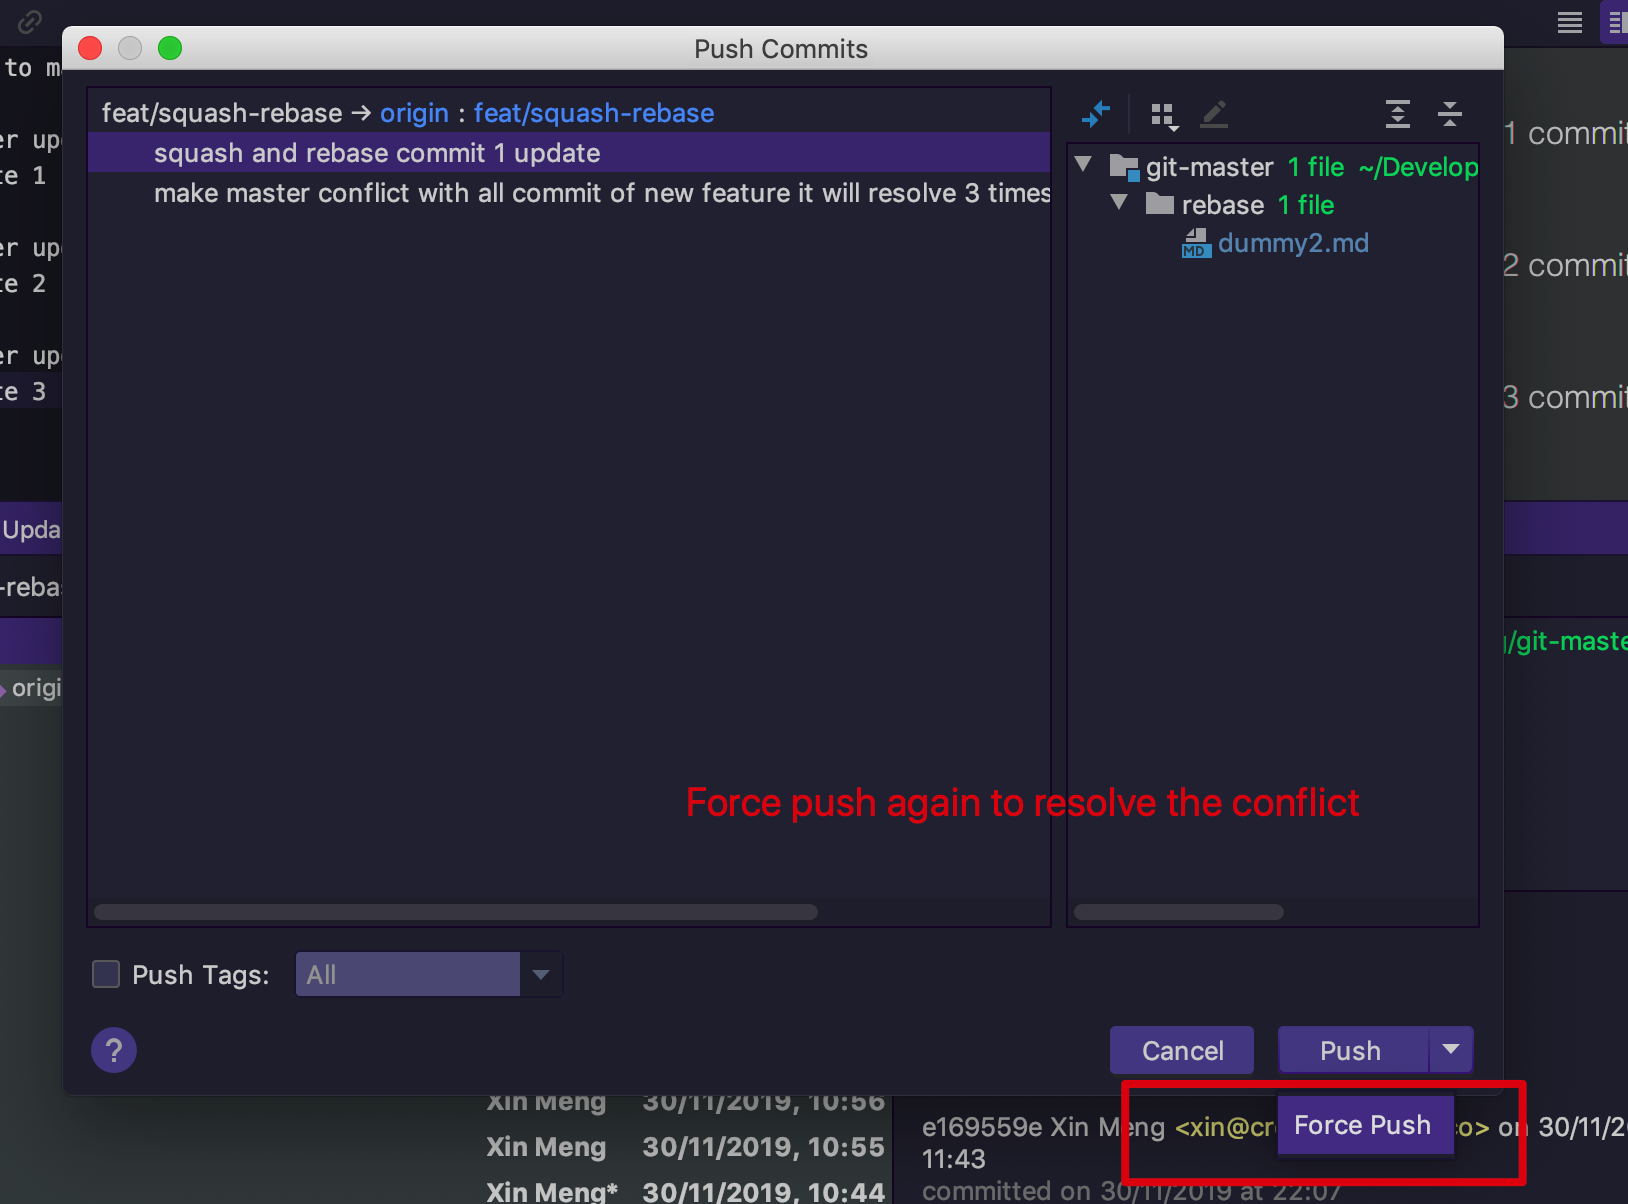
8. Force push
Because the git commit history has been changed, the feat branch will be different from the remote, so you cannot push directly to the remote (get an error). You must force push to remote with your new feat branch.
There are several choices to backup your previous multiple commits feat branches if you are not confident to force push:
- backup in local: create a separate branch with
feat/XXXXX-backupbefore you rebase for the previous multiple commits branch.- backup in remote: create new feat branch with
feat/XXXXXX-newafter you rebase and push to remote. So the previous remote branch will be kept. If you have a PR, close it. We can remove the branch when we make sure the new branch works totally.
9. PR update
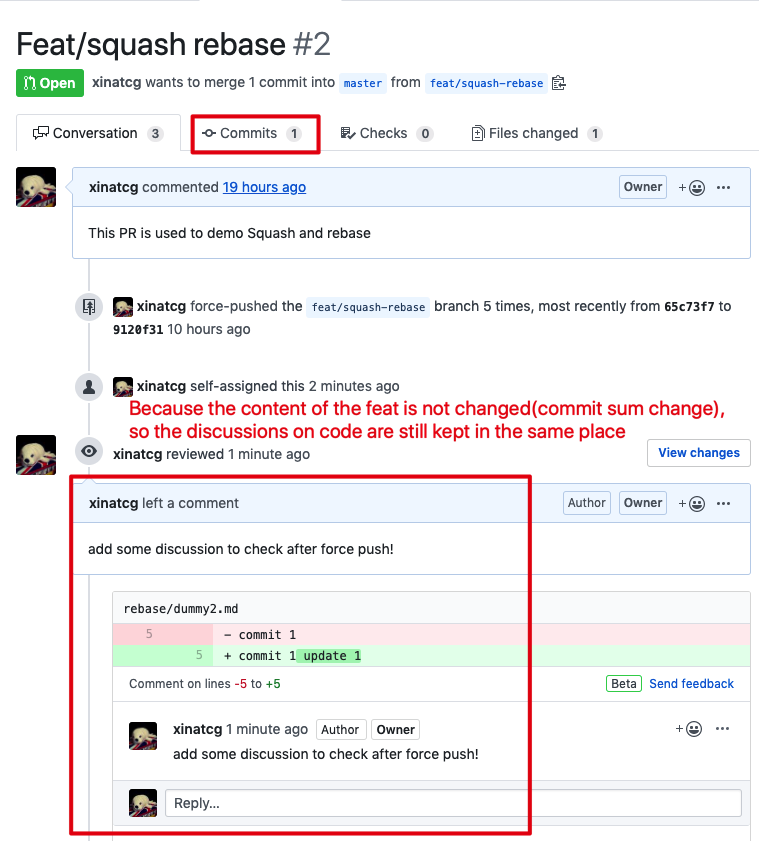
If you have the corresponding PR on the GitHub, the PR will be updated. There should be conflicts between your new feat branch with the latest master. Because even we rebase, but we only rebase the feat brach itself, nothing code is changed on the feat branch. The only change is the sum of commits from several to single commit.
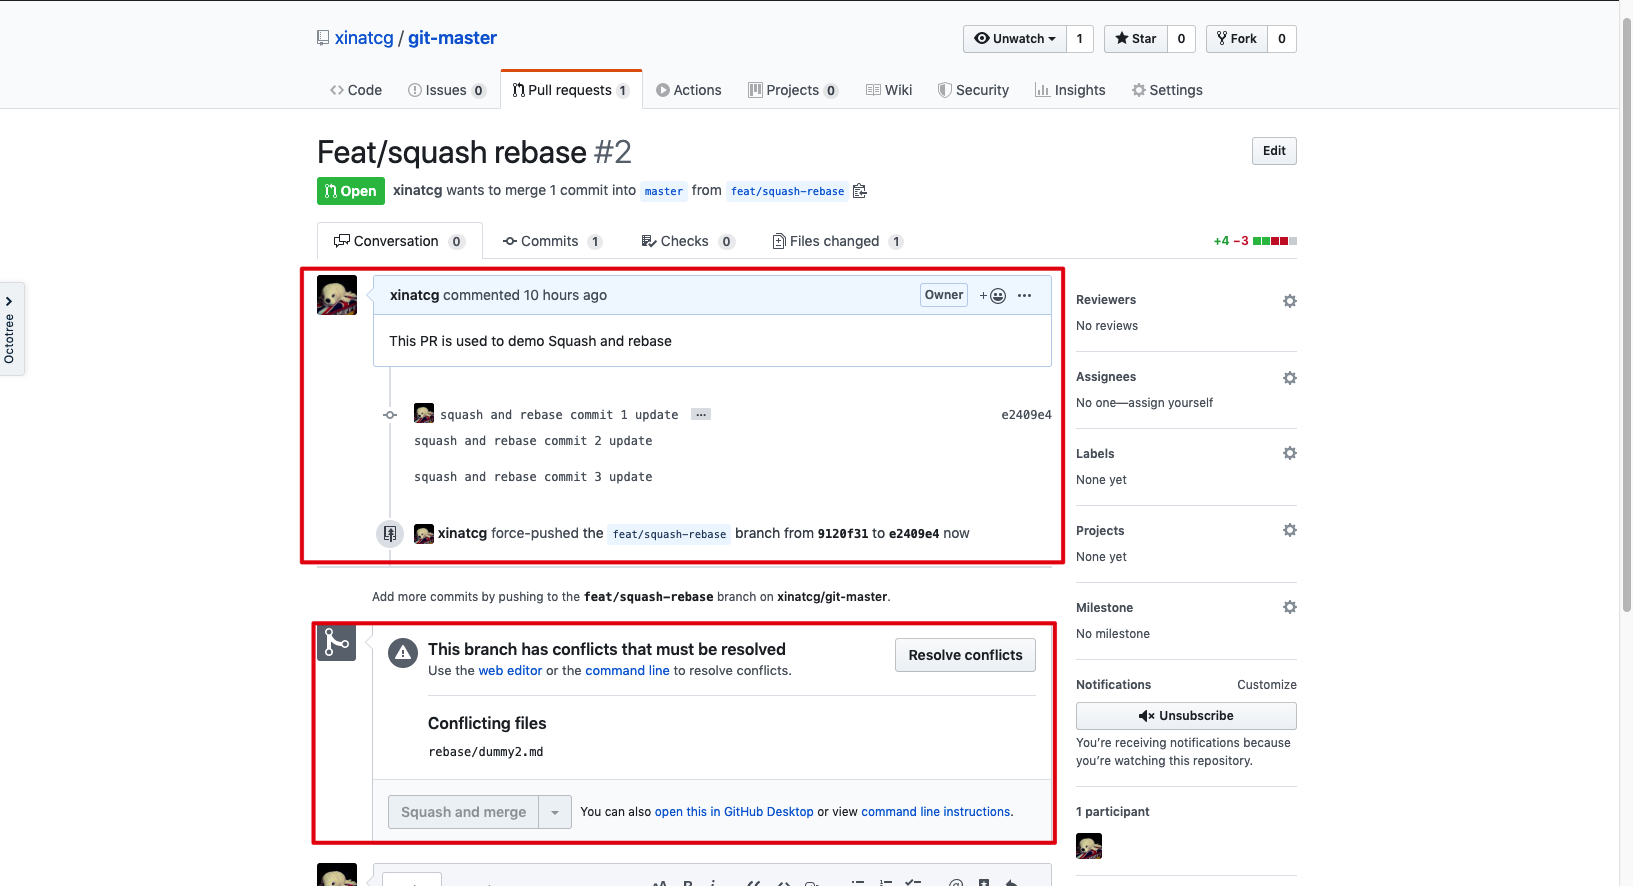
If you have some discussions on the specified code, they will be kept, and the reason is the same: All the code is the same as the previous multiple commits feat branch.
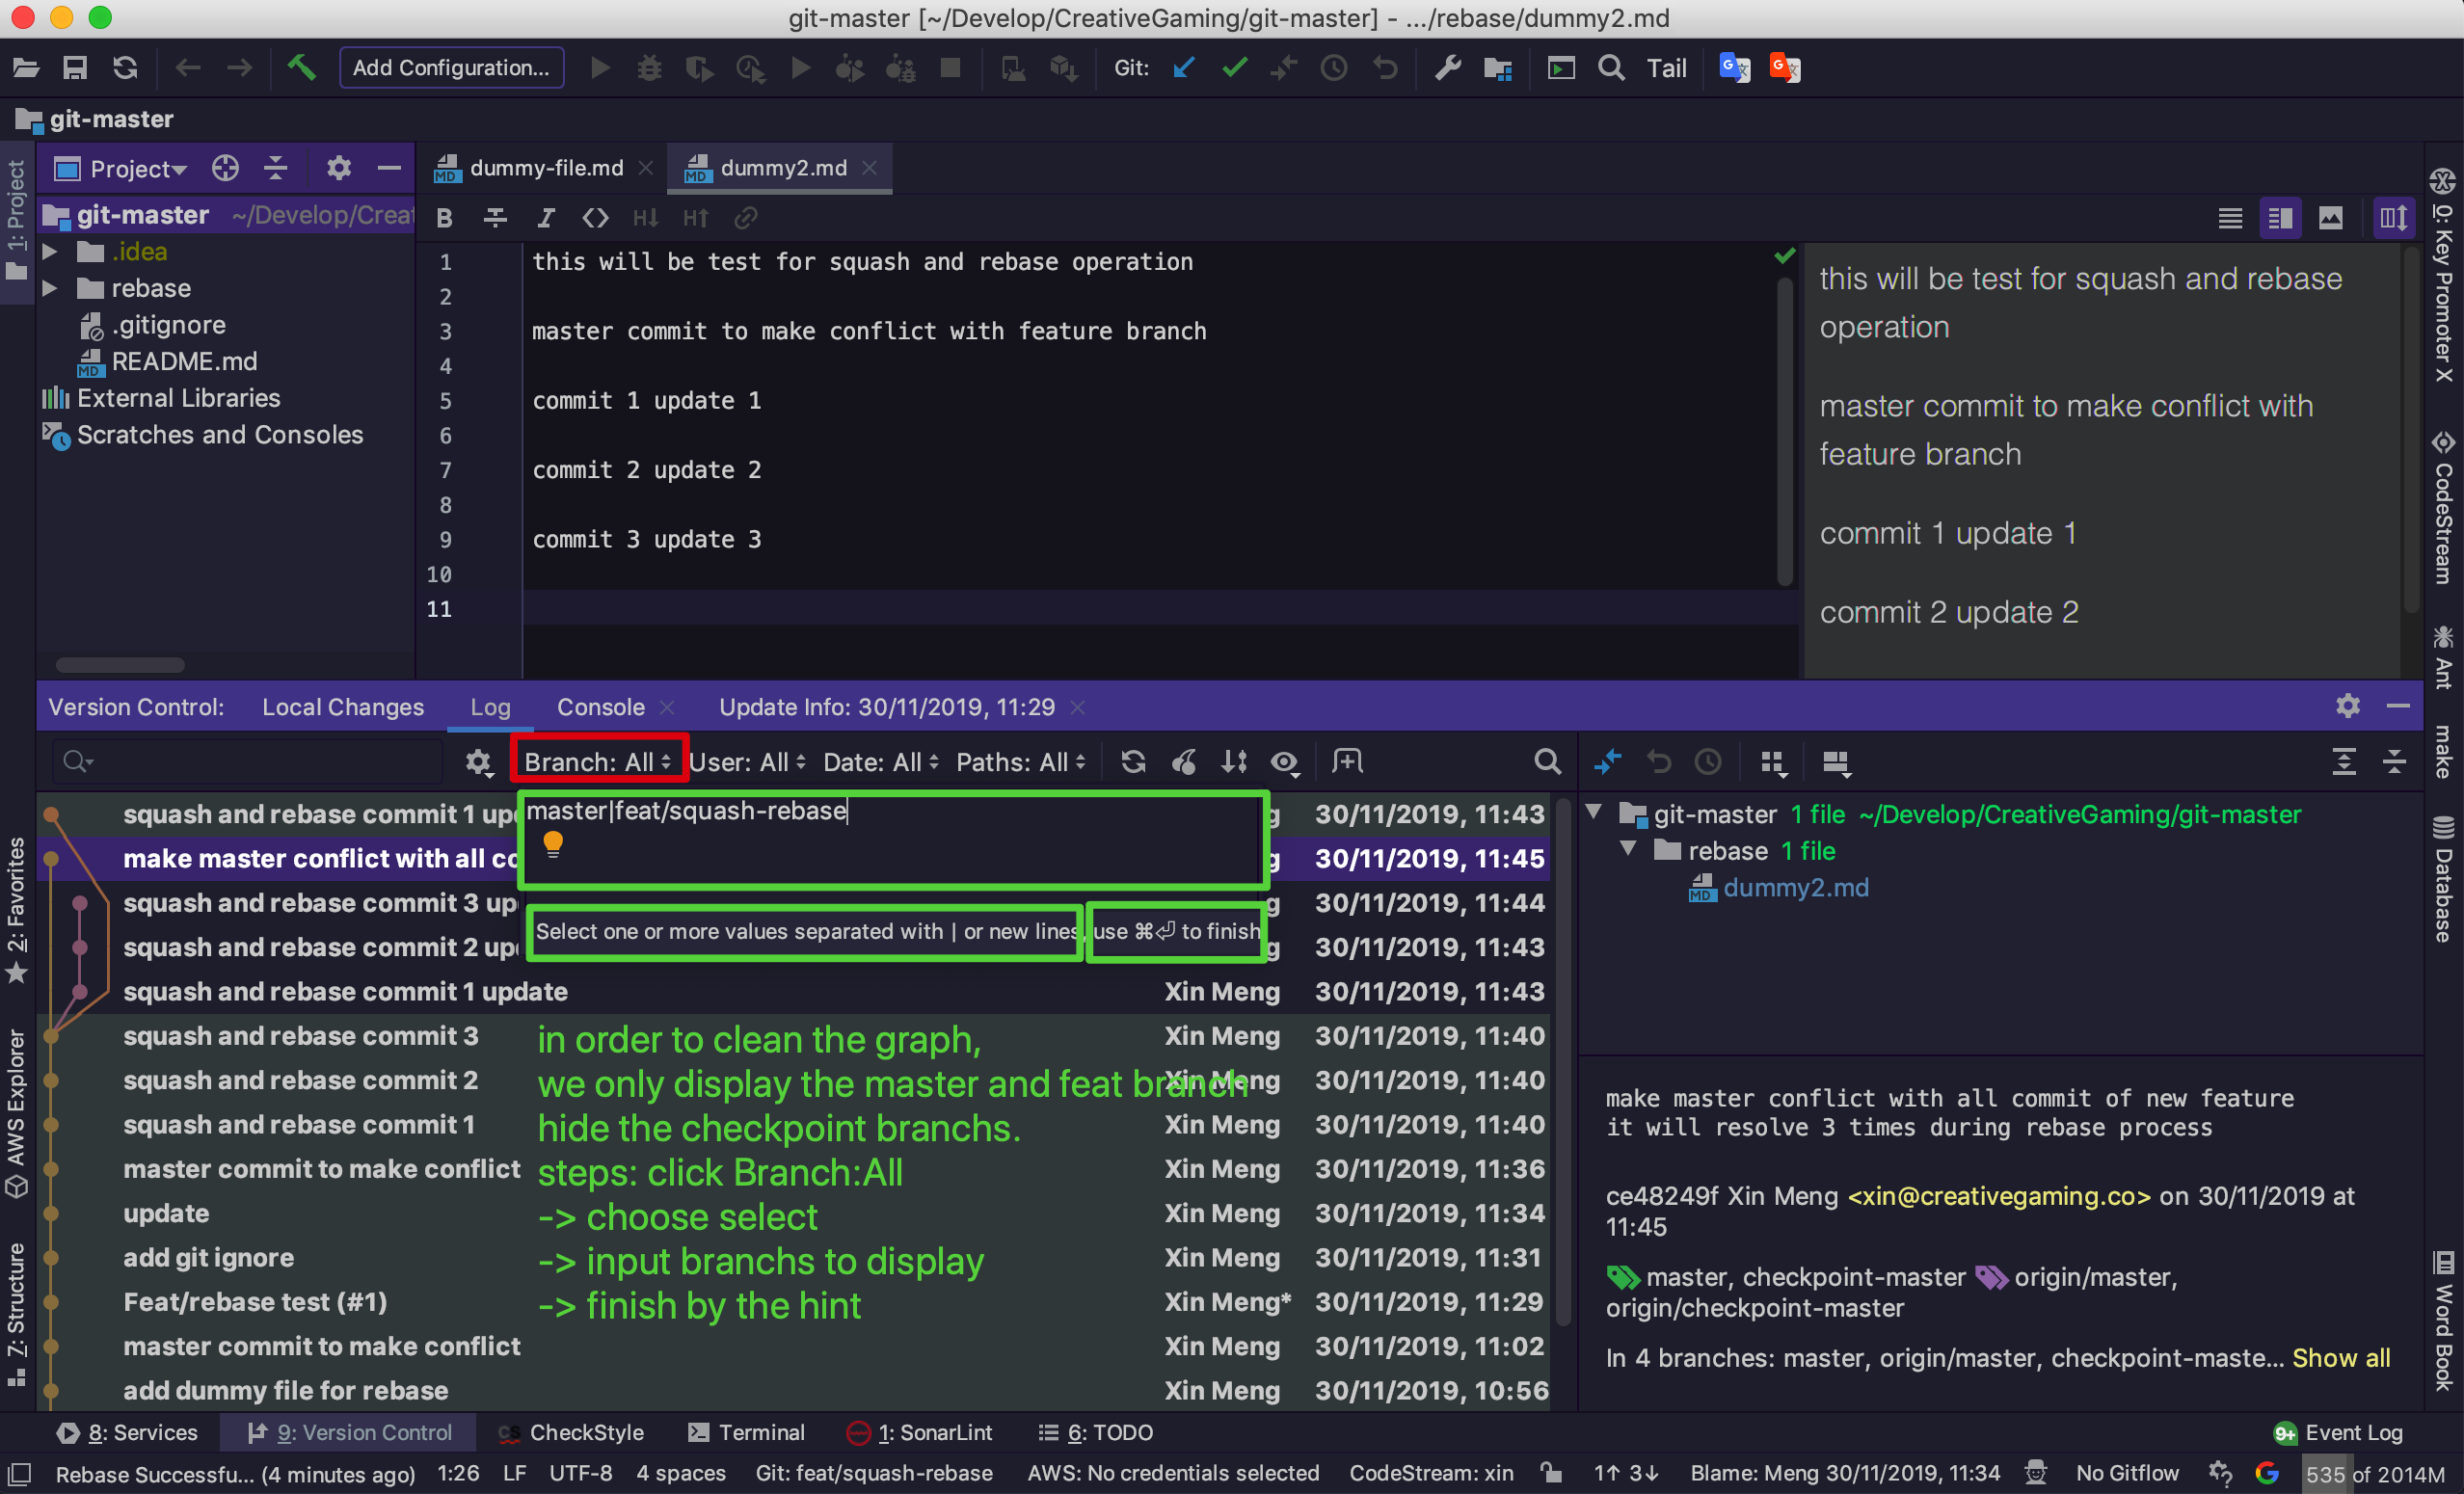
10. Make the git graph log clean
Before we Rebase feat branch onto the master. We’d better make our Intellij git graph log clean to prevent mistake.
The Intellij graph log supports filter specified branches by clicking: Branch: All -> Select -> Input Branch -> Command+Enter.
In this tutorial, we only need to display the feat/squash-rebase and master branches:
11. Rebase from the graph log
If we want to rebase onto an existing branch, we can use the Git Graph Log context menu to initial the rebase process.
Right Click the Target branch(master) -> Choose Branches -> Choose master -> Choose Rebase Current onto Selected.
Base on the name of the button, we can know that it will rebase your current branch (feat/squash-rebase) onto the selected branch (master).
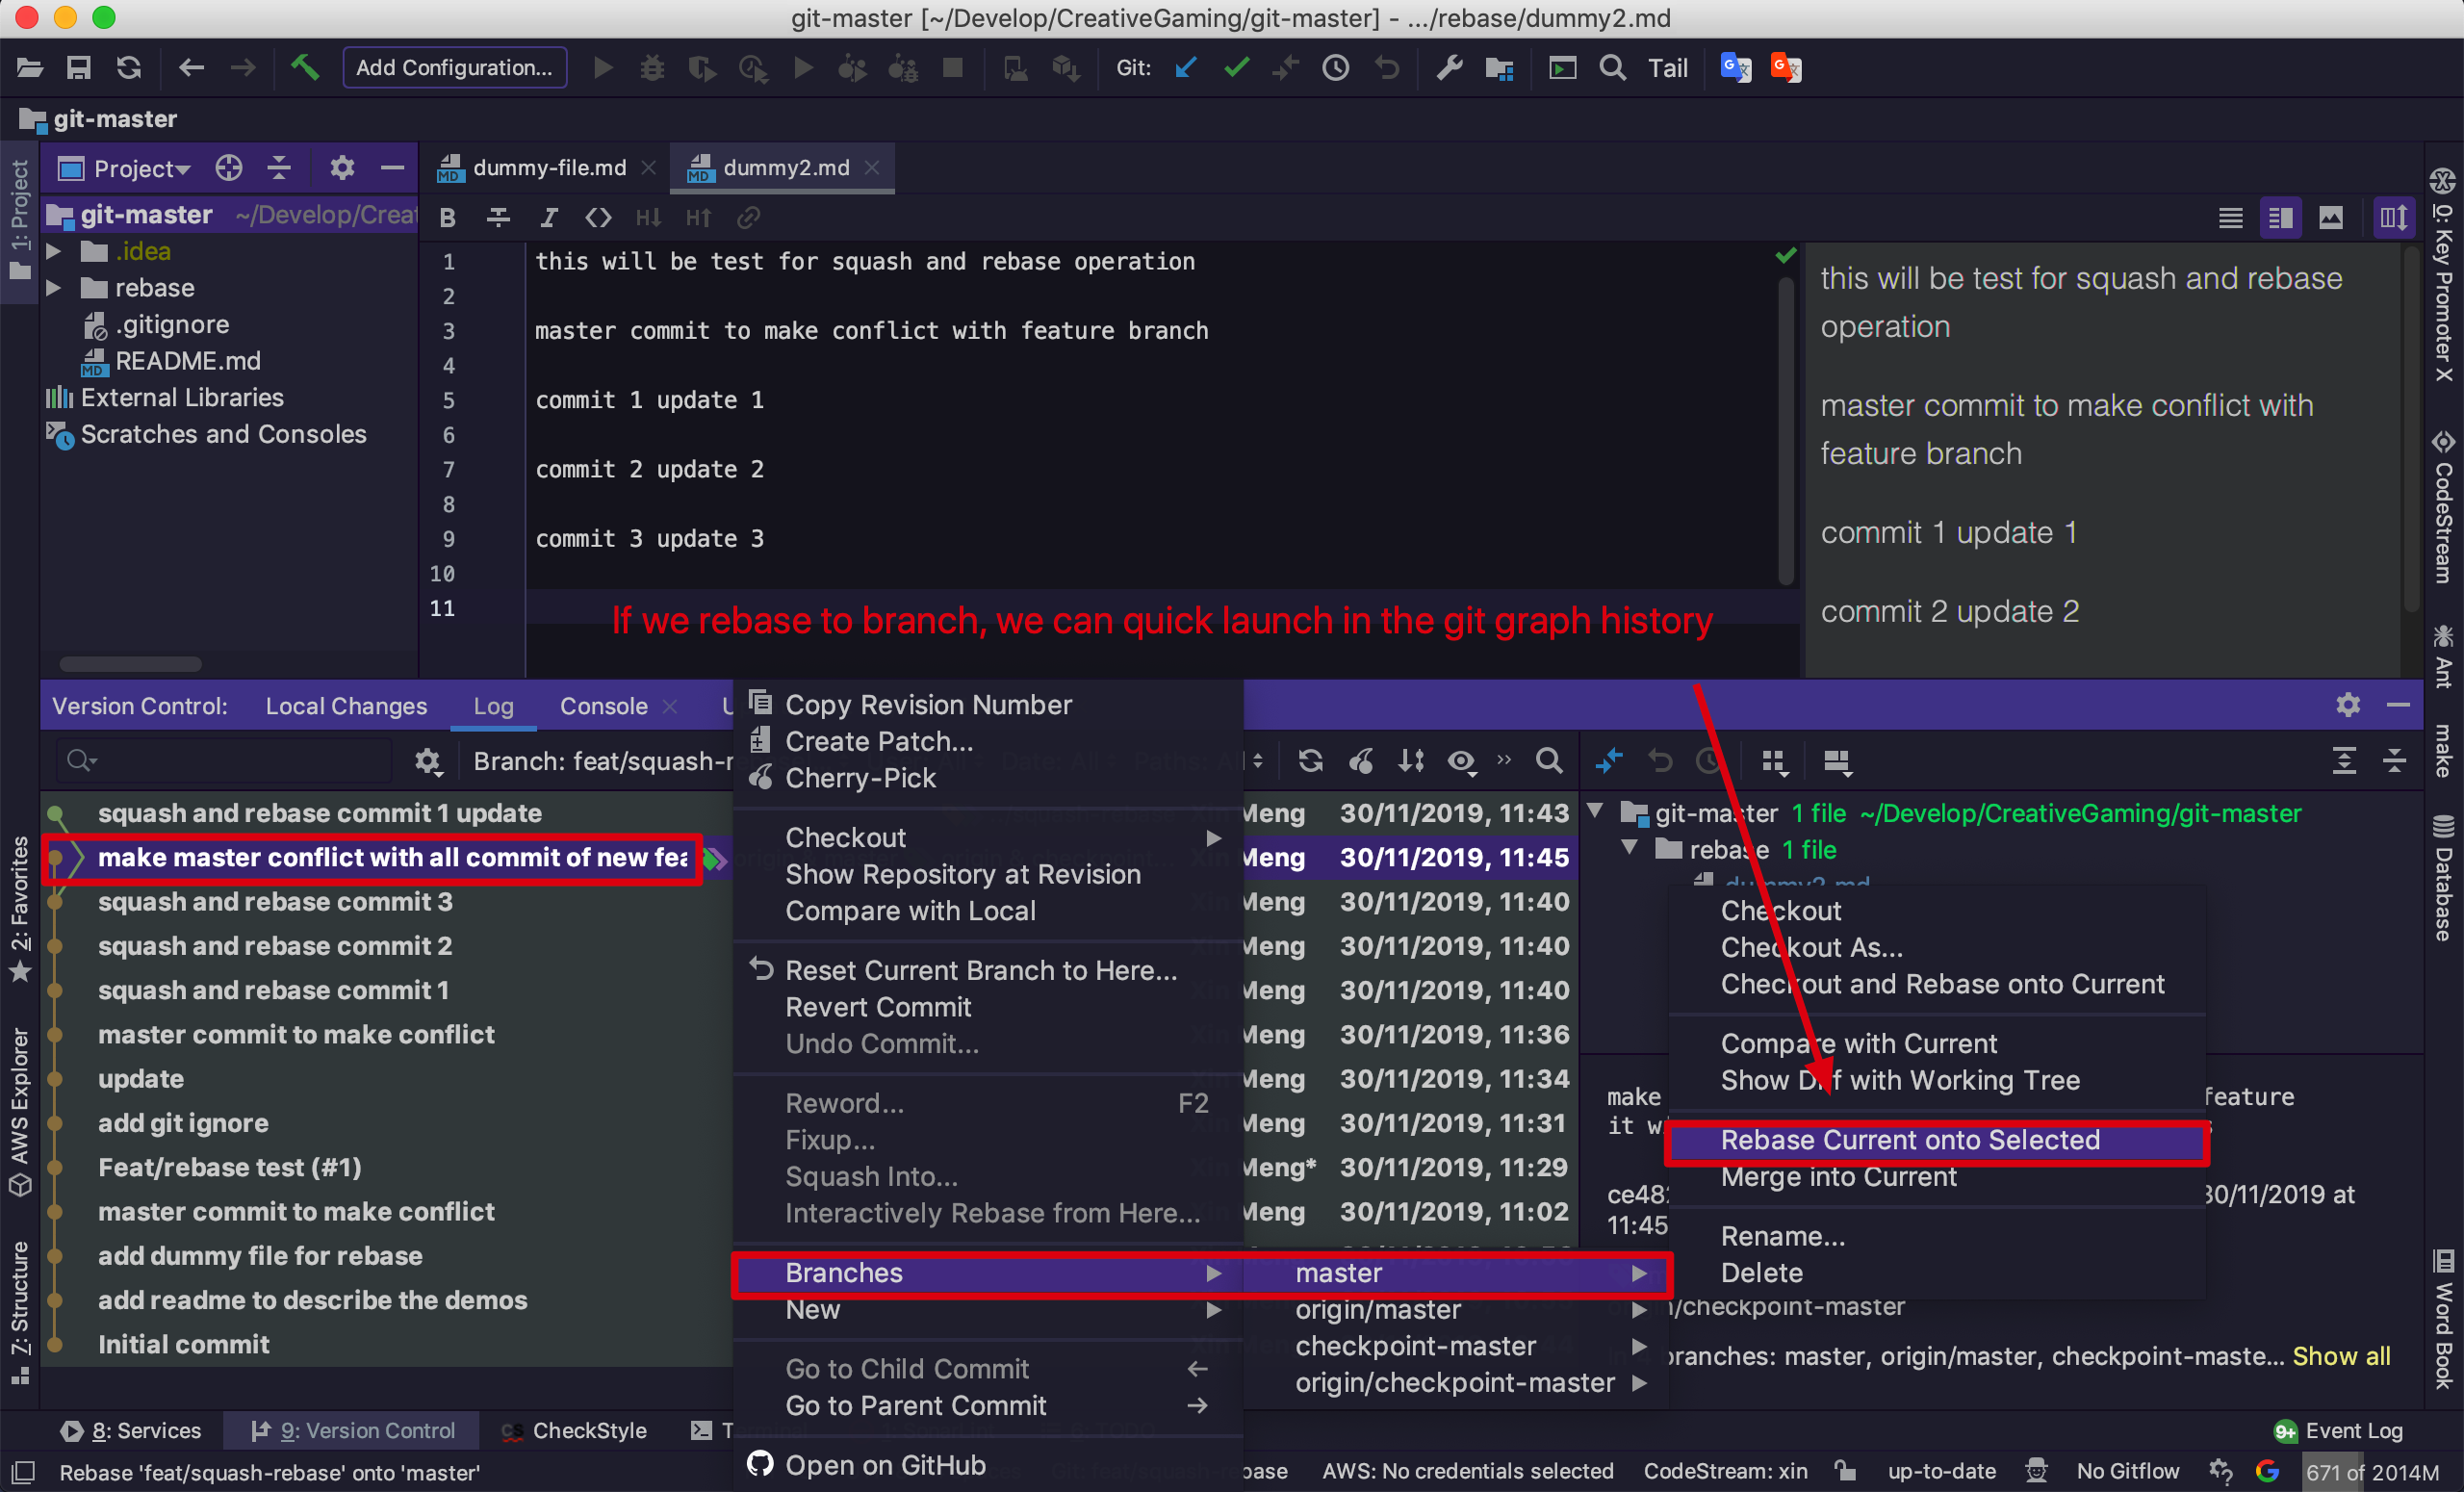
12. Get Conflict
Because we have modified the master code to produce conflict with the feat branch on purpose, so we will get conflict during this rebase process.
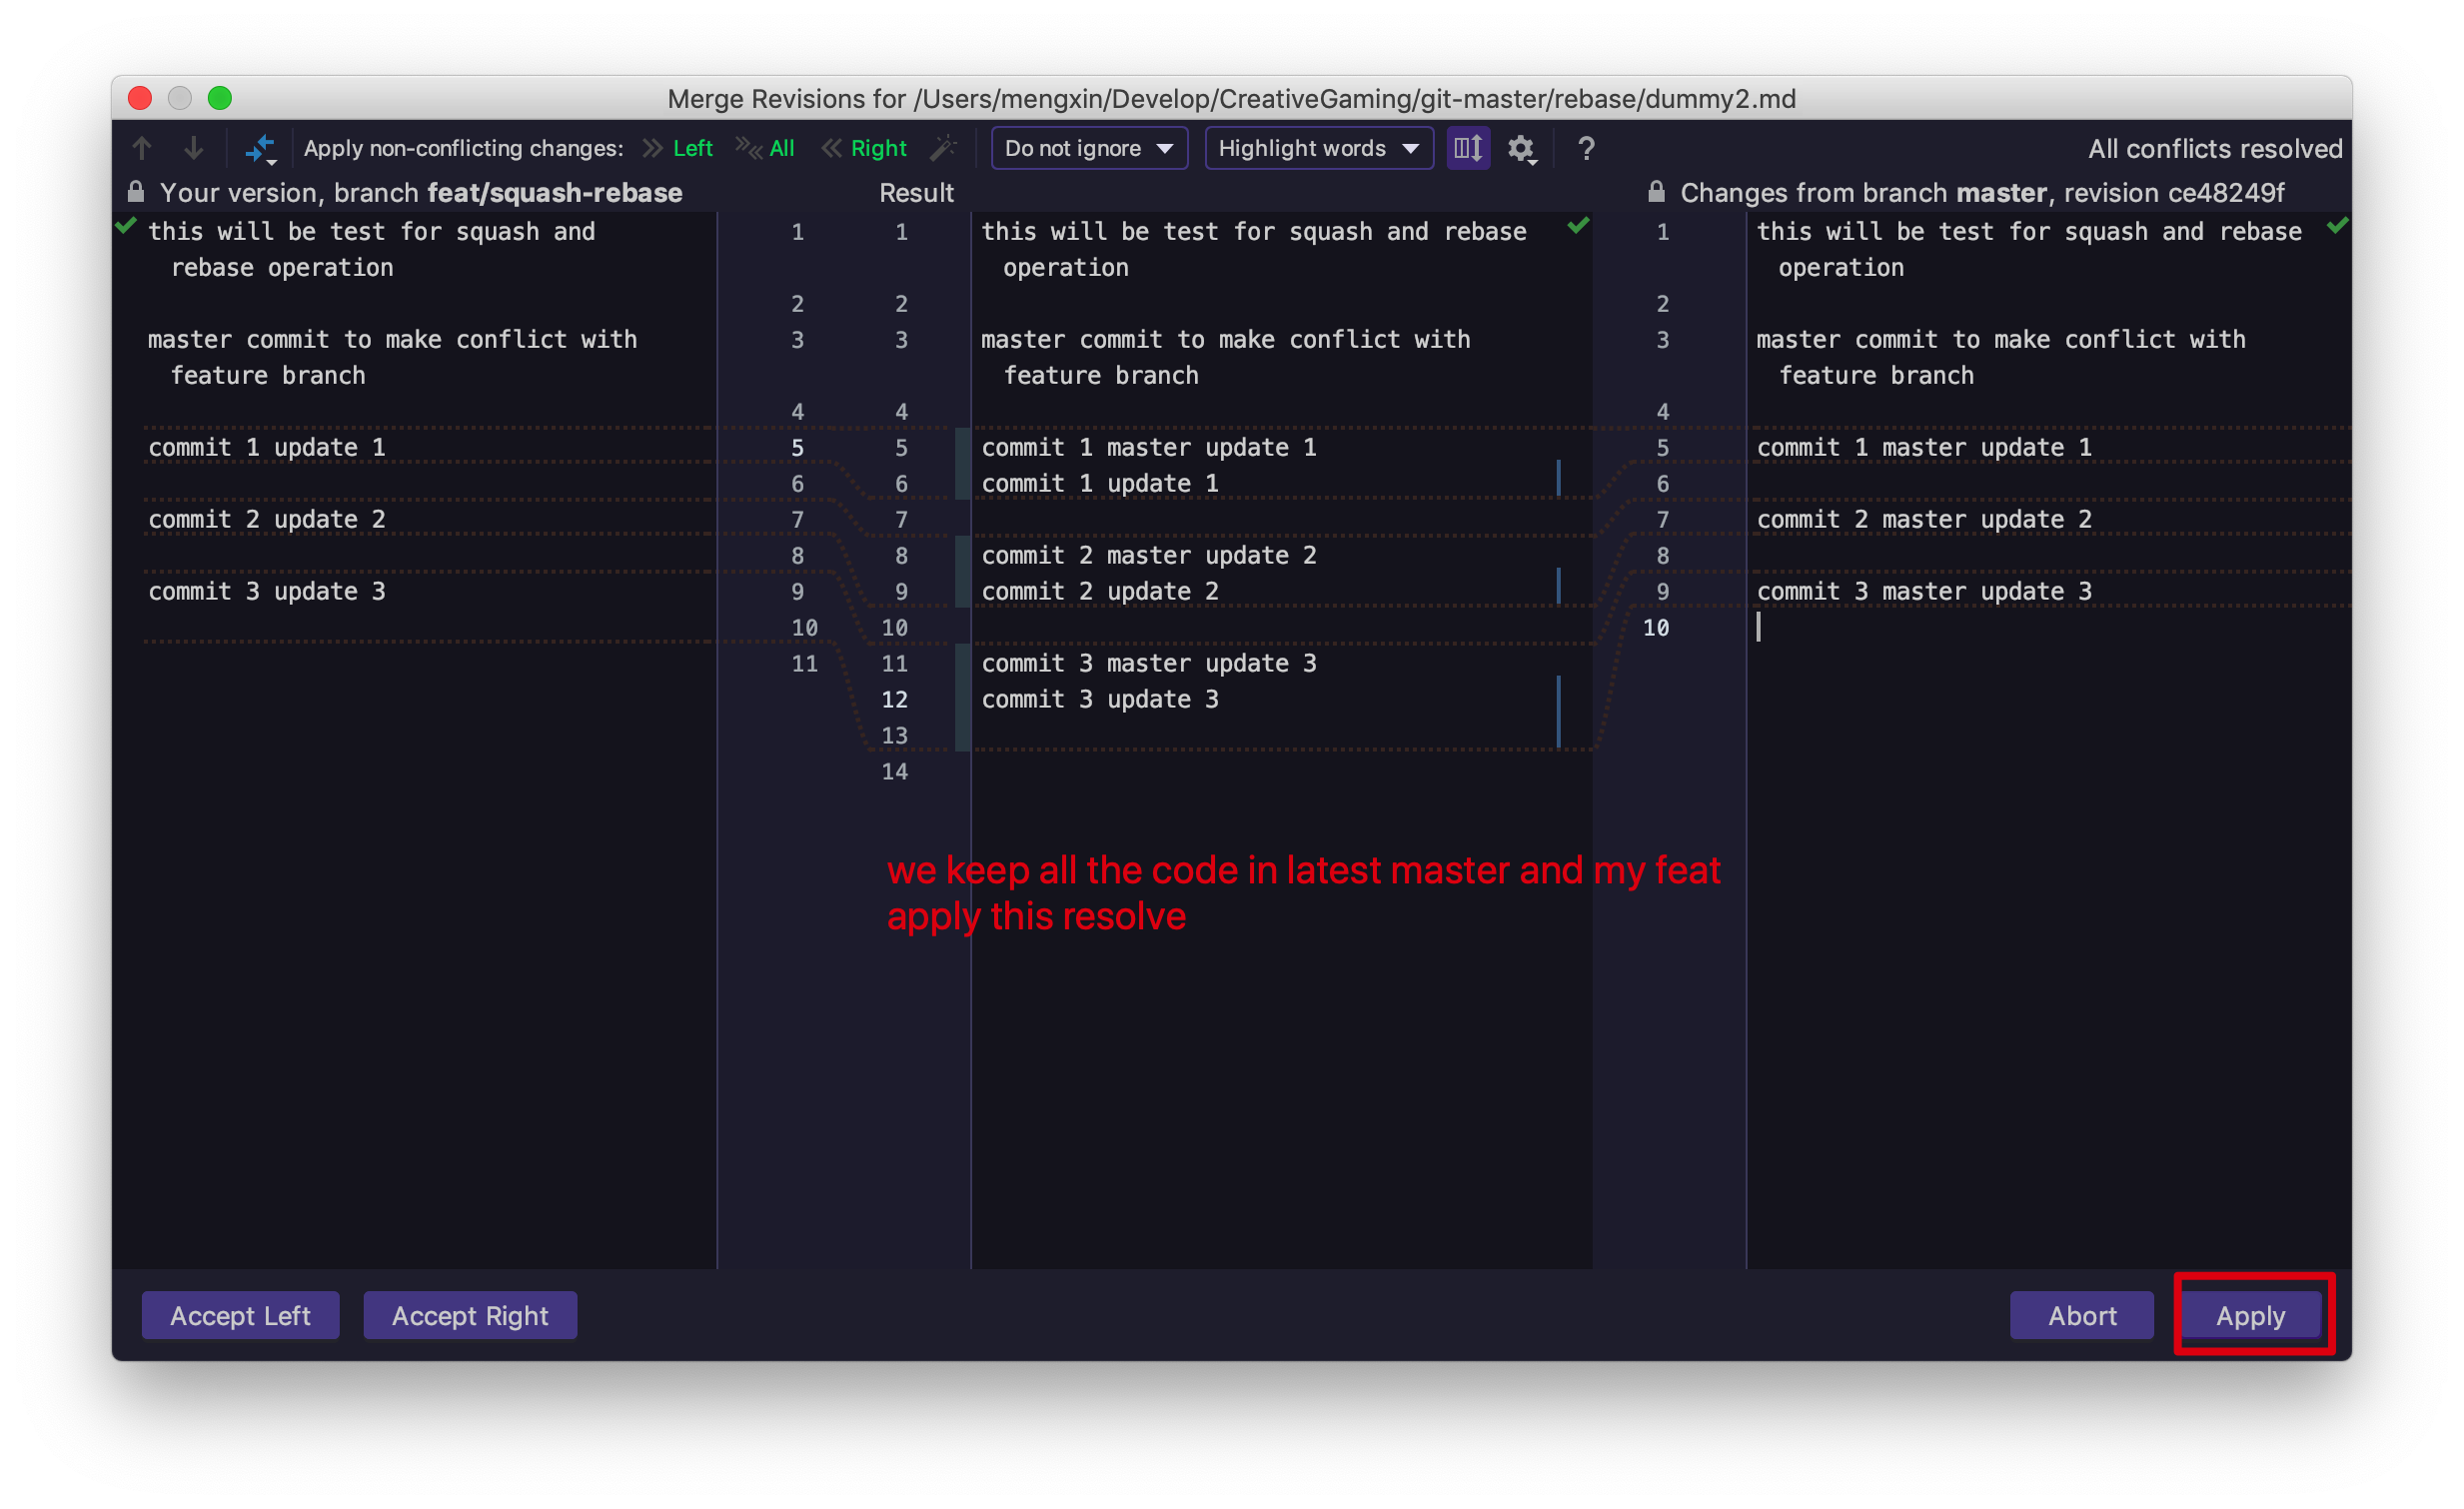
The resolving process is standard Intellij Conflict Resolve Dialog. We use the Merge.. to resolve them which is the most flexible tool. If you want to learn more about the Intellij Resolving Conflicts tool check this official document or search by Google.
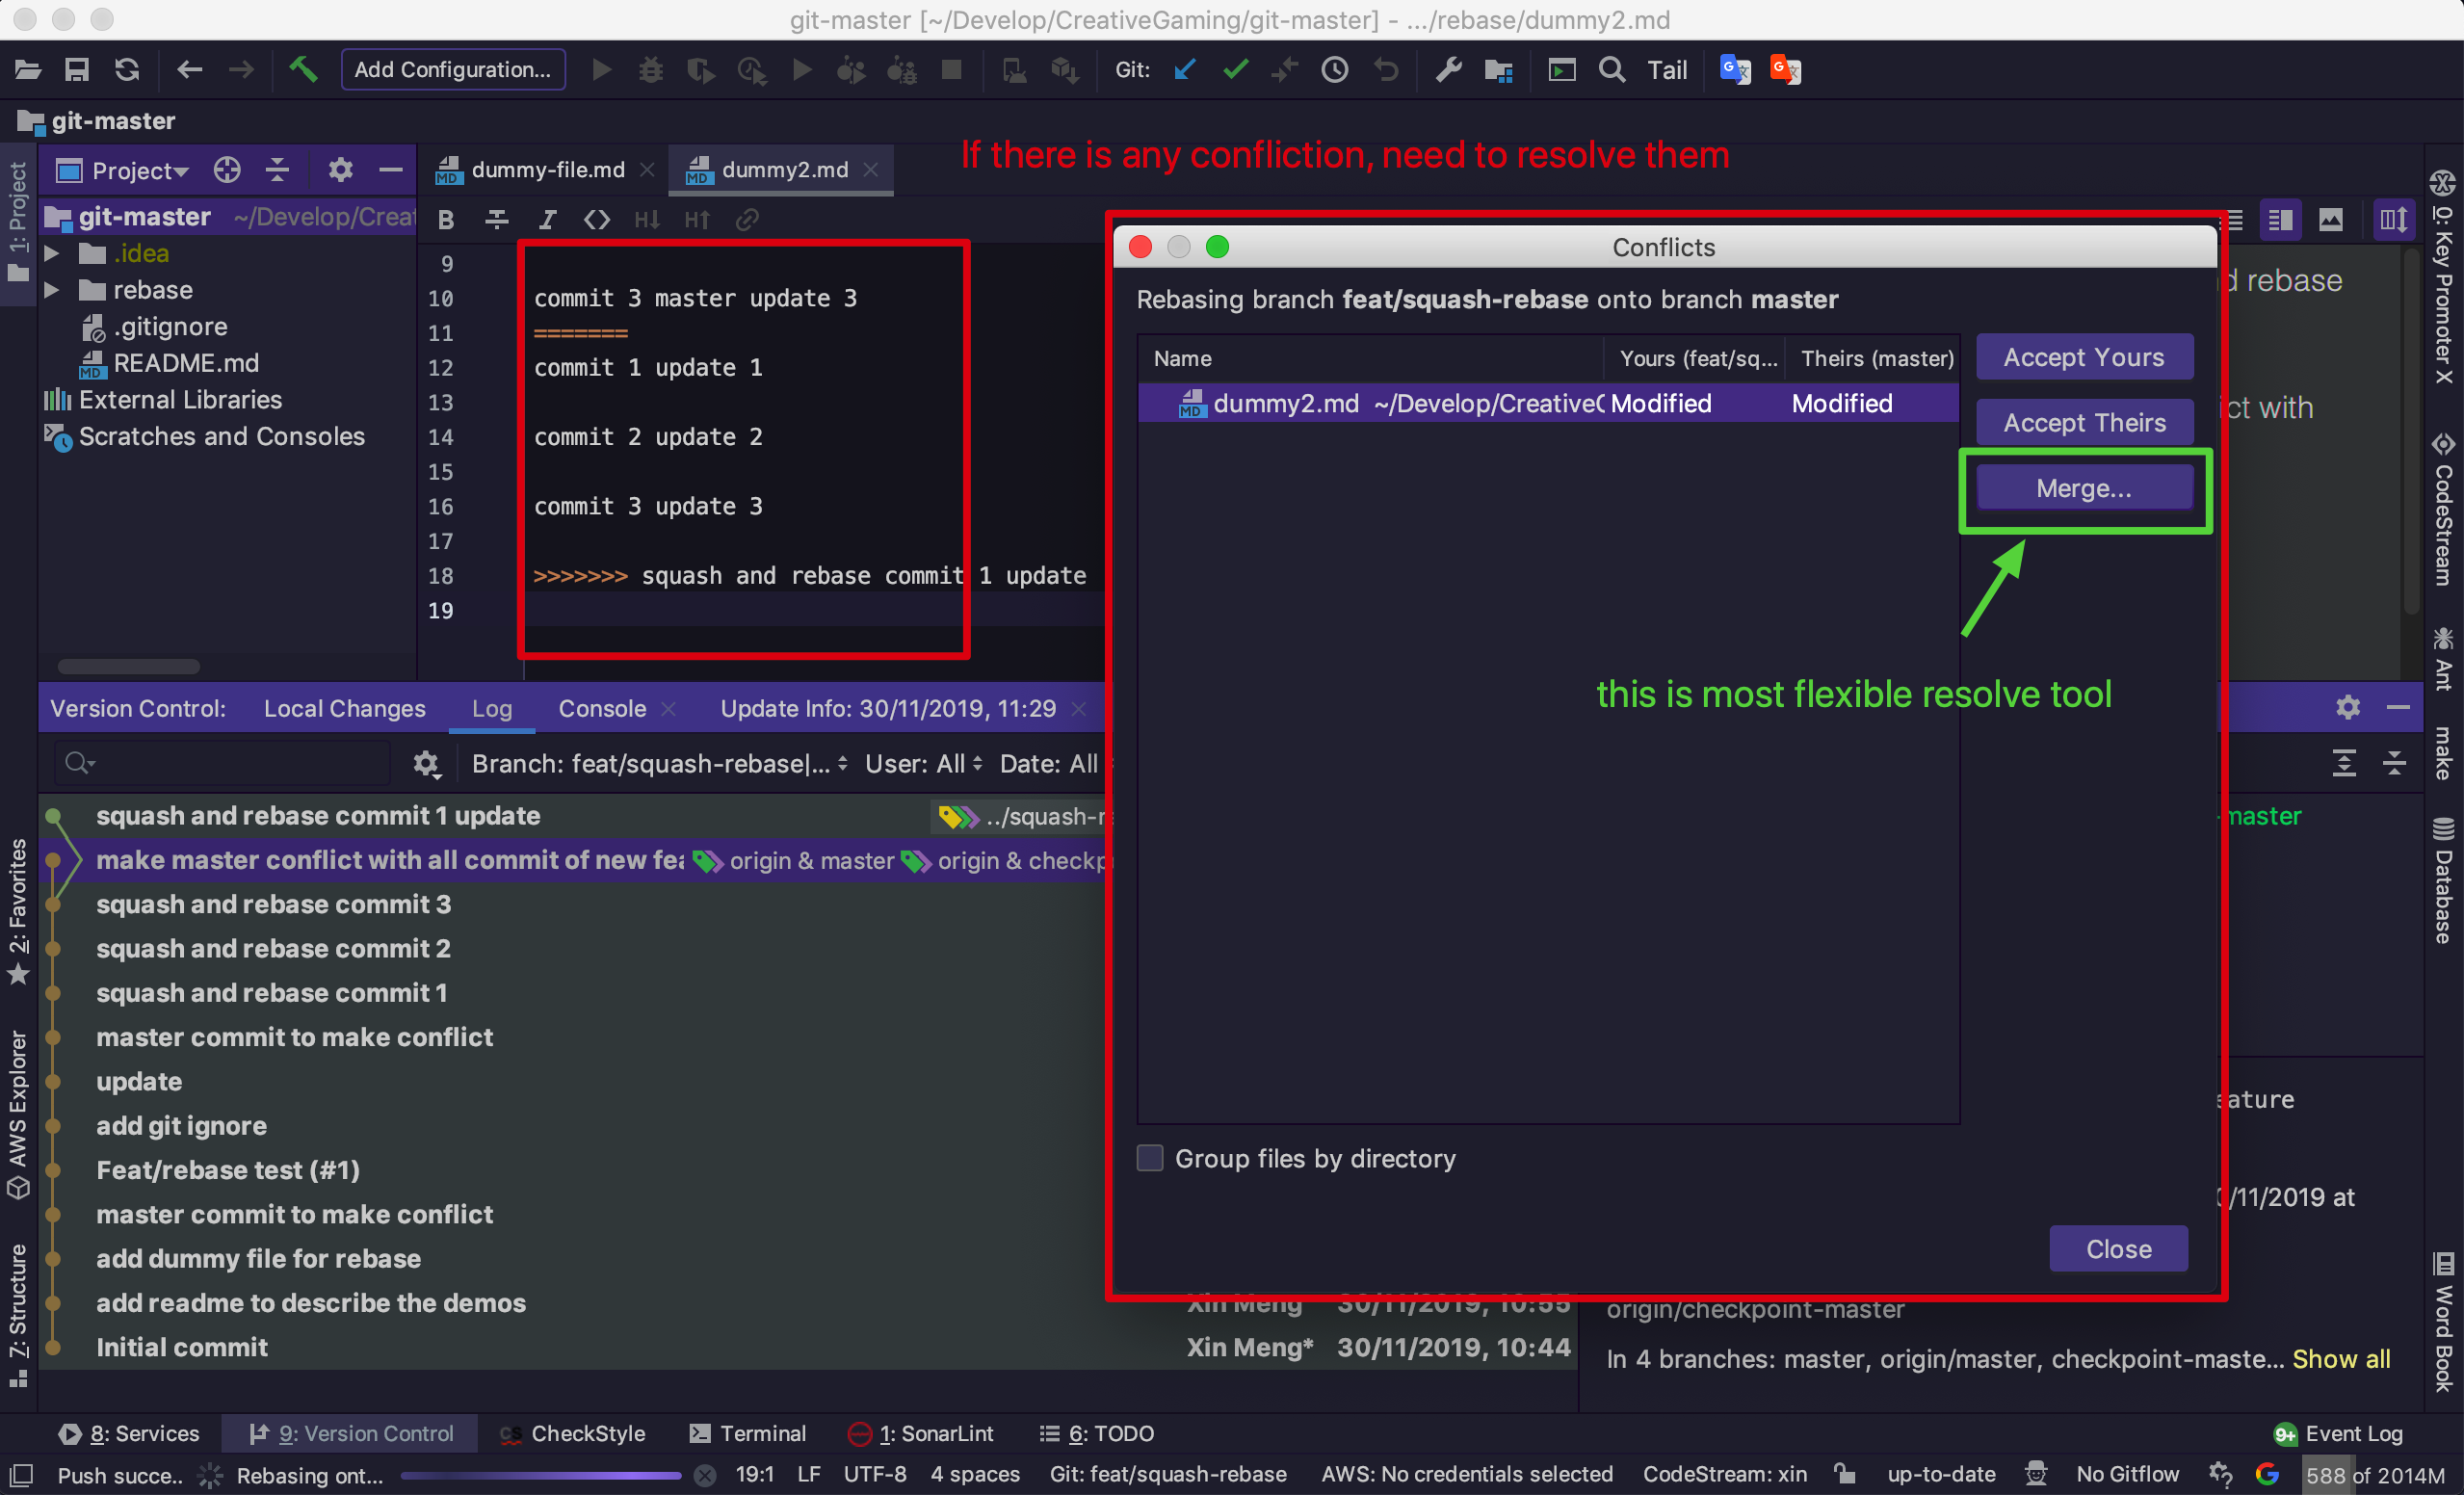
13. Resolve Conflicts by merging
We resolve conflicts by merging to keep all the code in master and our feat branch. This step should be based on your project logic to make sure the code works. You’d better discuss with other developers who made the changes on the master and make the final decision which part code should be kept and which should be removed.
Here just a demo to merge all of them and keep all changes.
If you want to learn more about the Intellij Resolving Conflicts tool check this official document or search by Google.
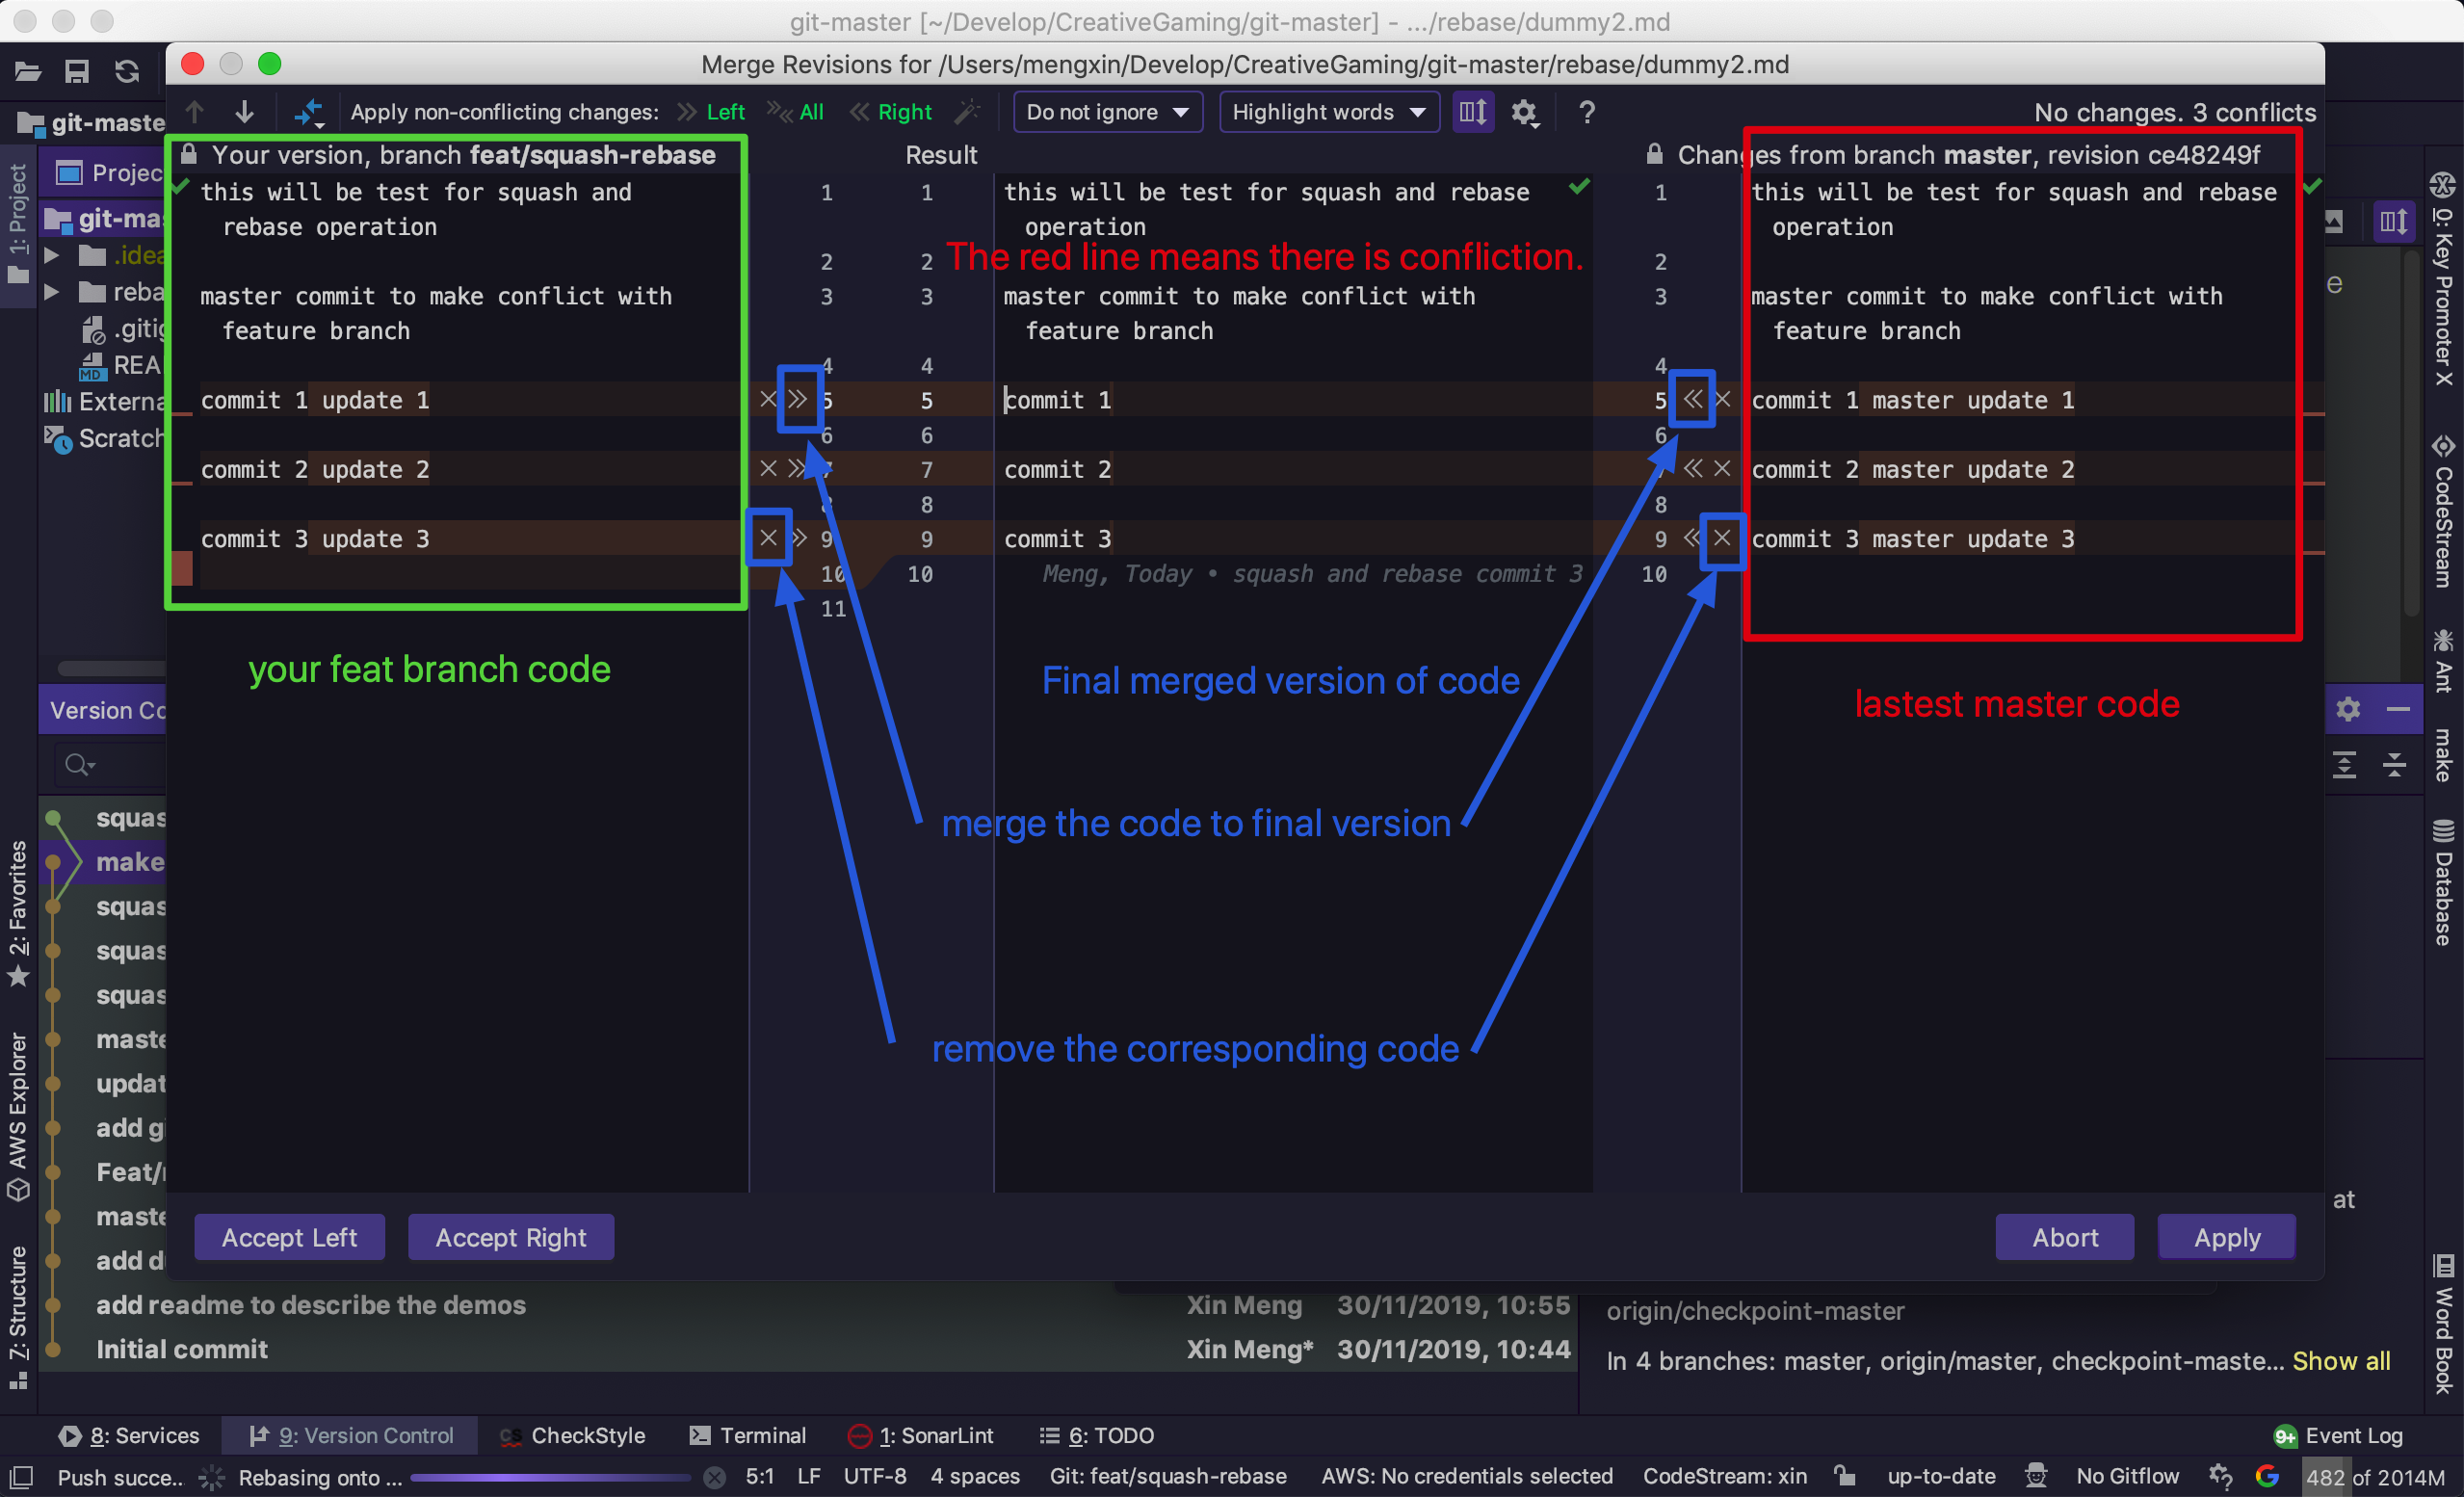
After finishing the conflicts resolve, we can click the button Apply and continue. Make sure there is no Redline in the resolve dialogue.
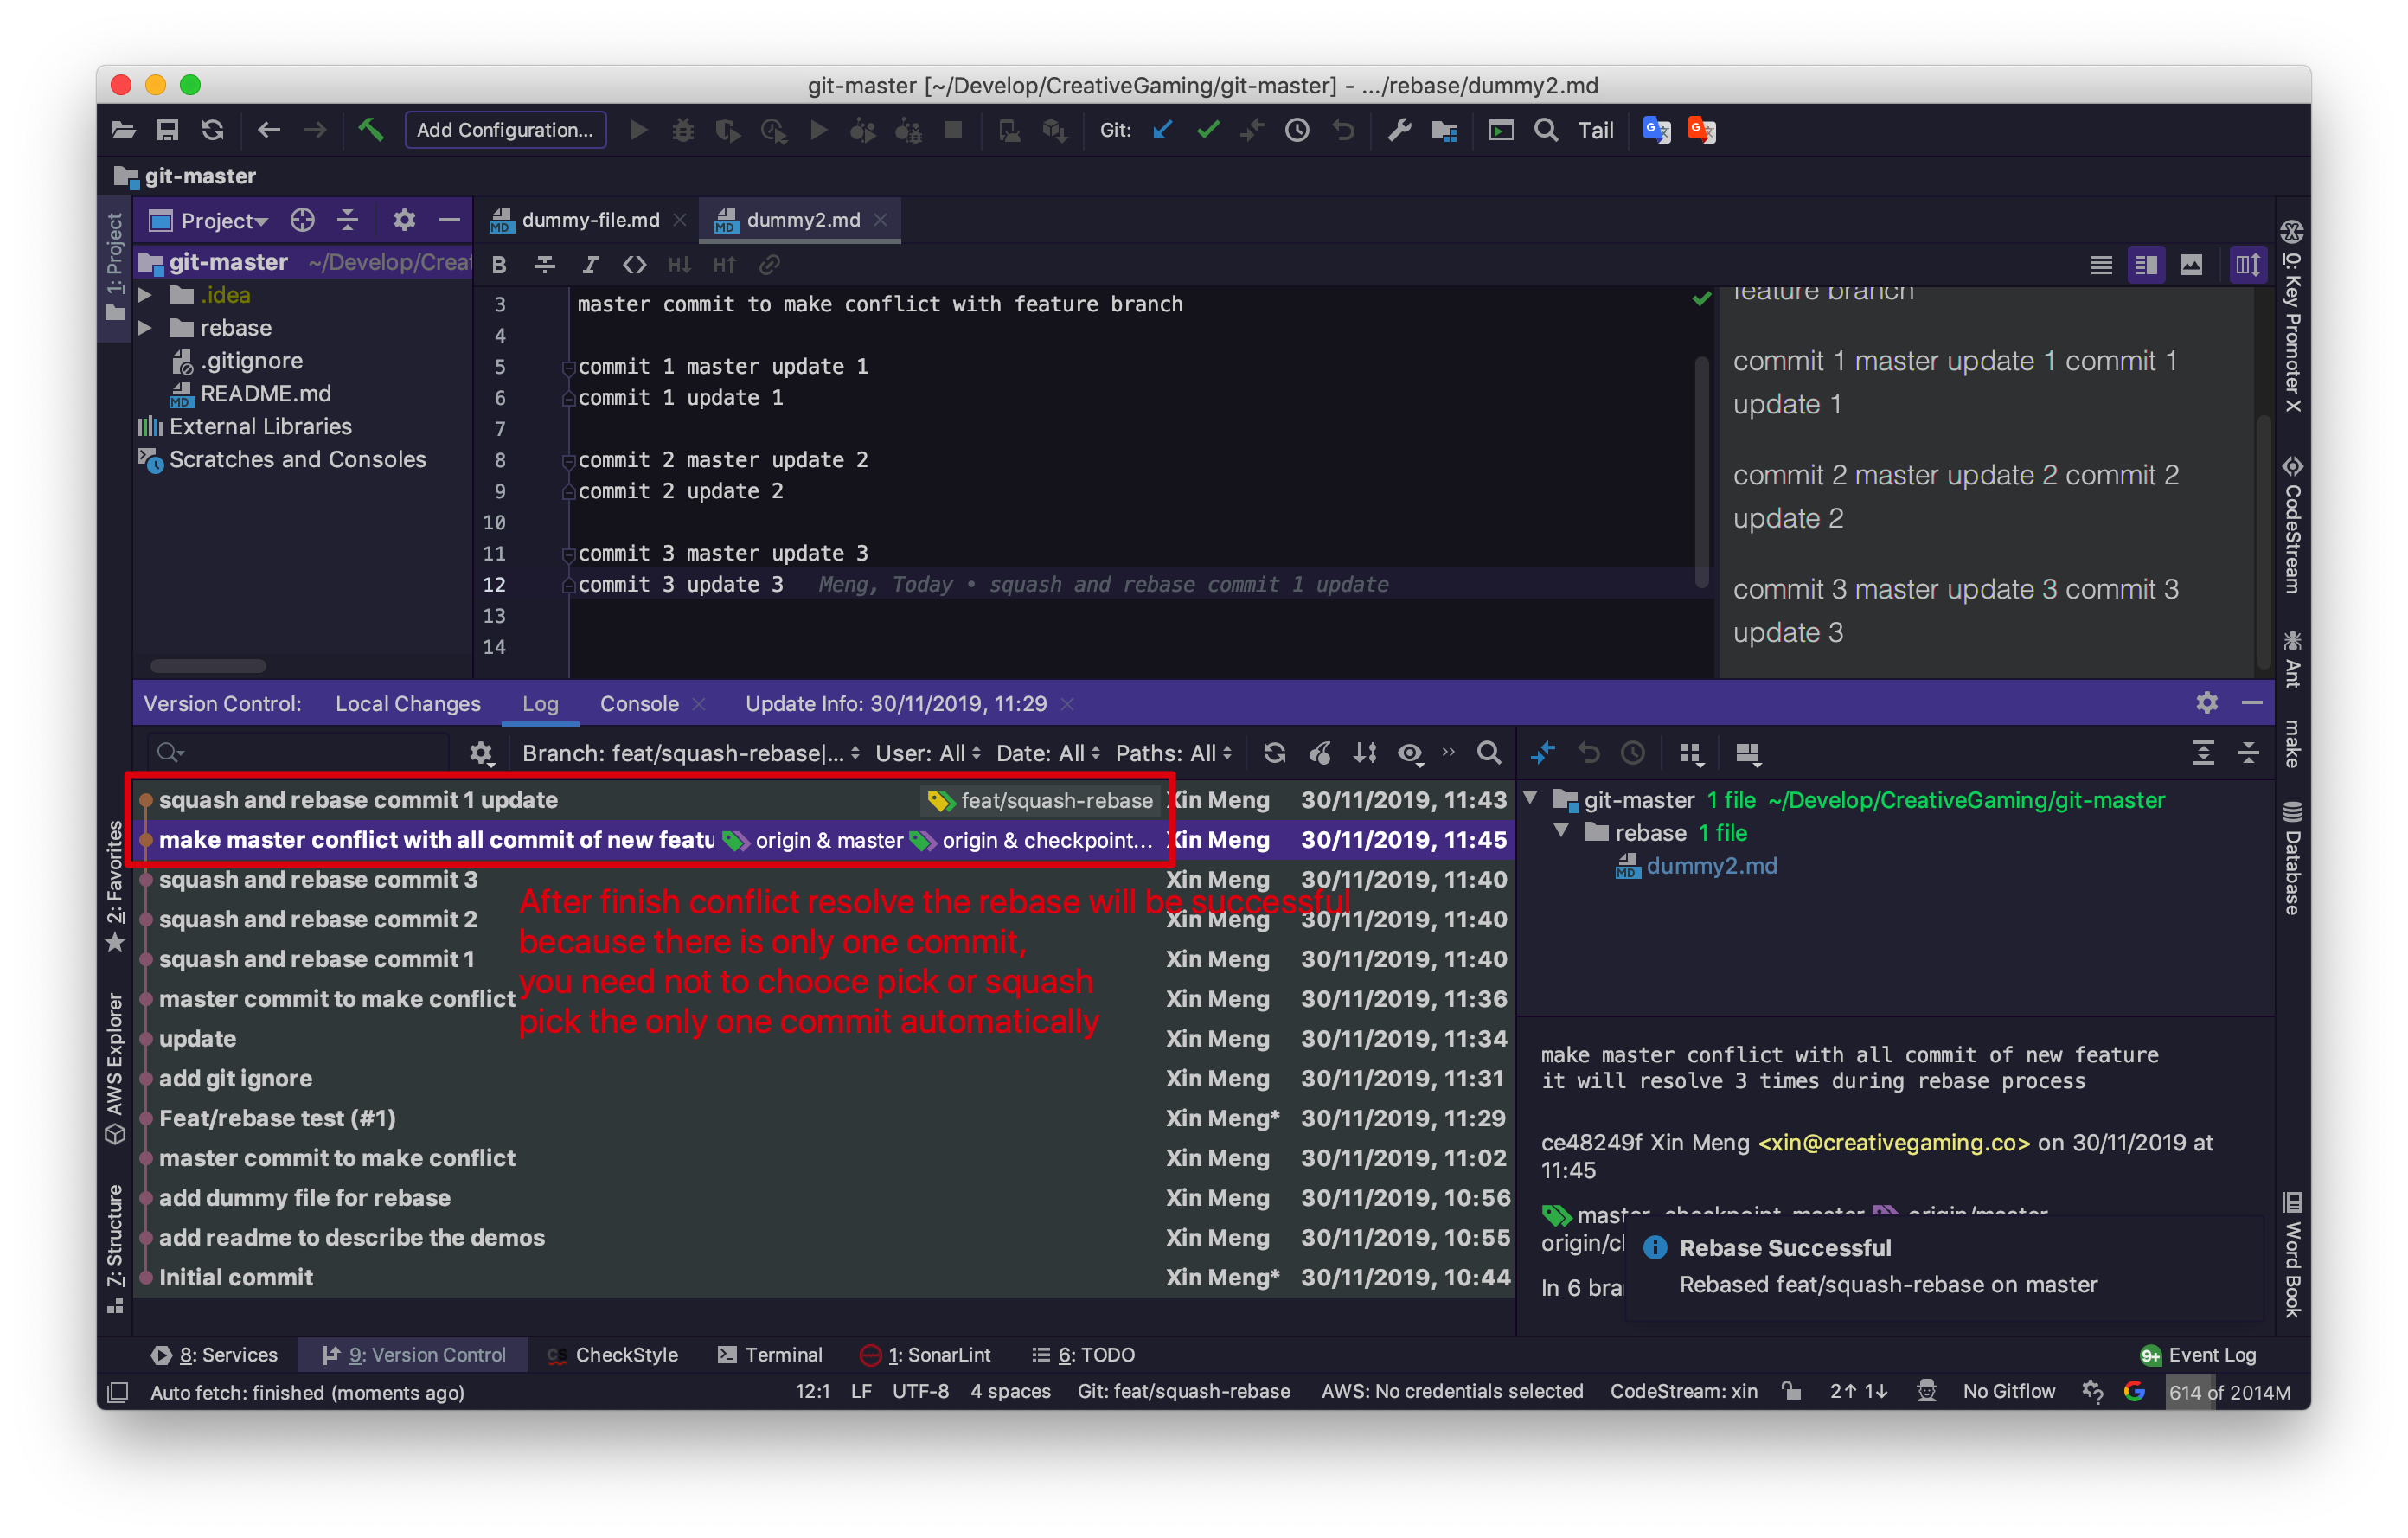
14. Finish the rebase onto master
After the conflicts are resolved, we will find the rebase process is finished. Because there is only one commit in your new feat branch, so the Intellij set it pick directly and there is not future configure dialogue (The bash command will display the step even only one commit).
And you can check the new feat\squash-rebase has been changed to start from the latest master branch.
15. Force push to new feat
Same with Step 8, you also need to push to remote by force. The backup options are also the same as Step 8.
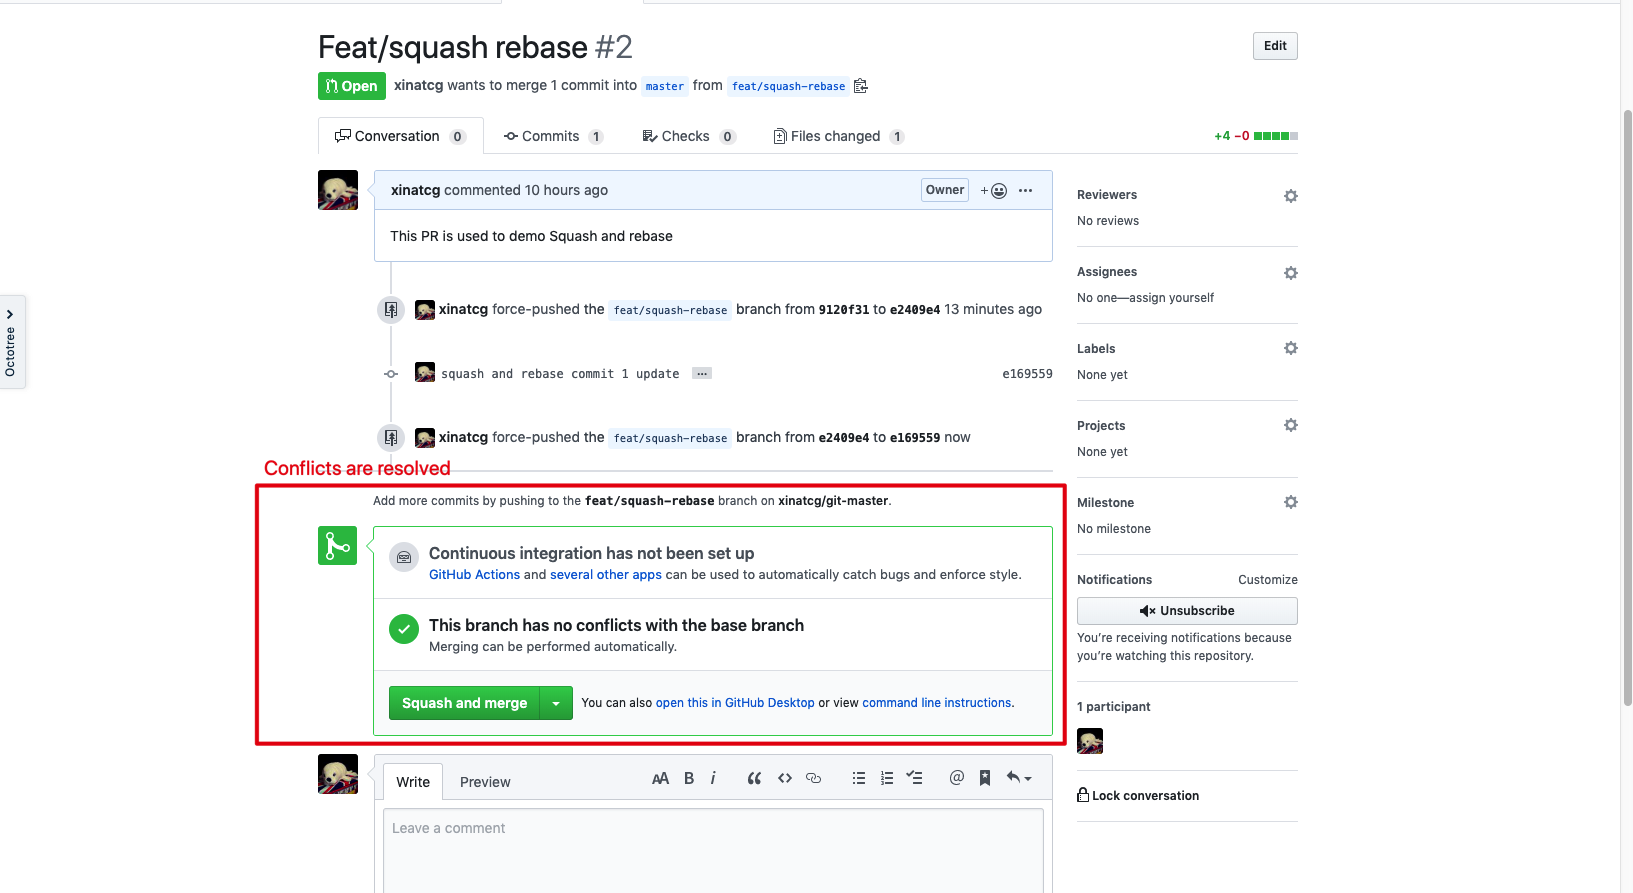
16. PR update and discussions
We can check the PR is updated without conflicts because the new feat branch is started from the latest master branch.
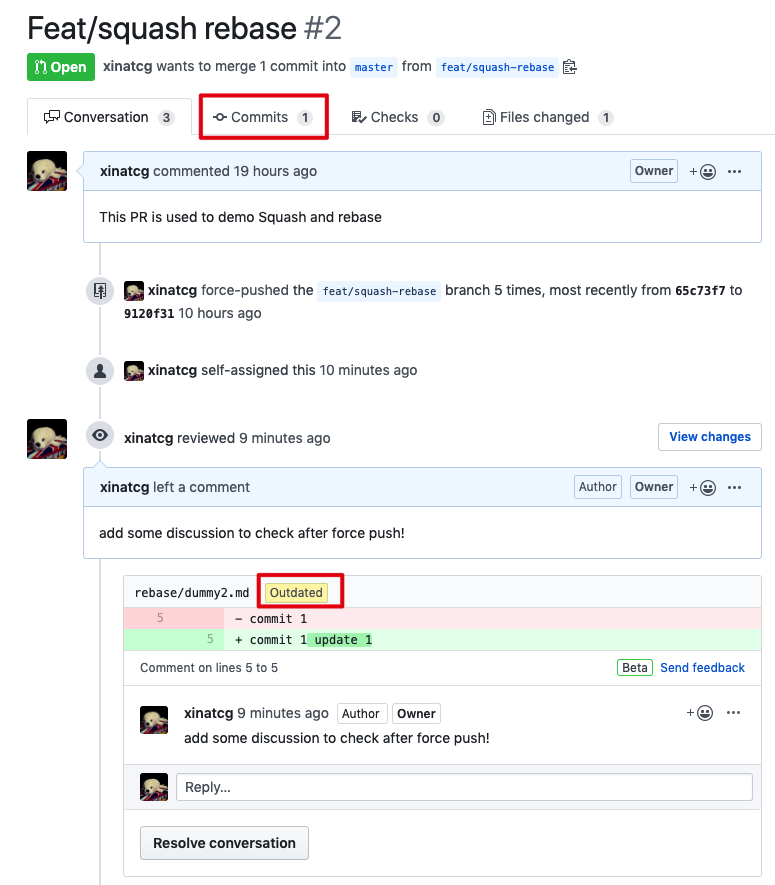
If you have previous discussions on the code, the discussions will be outdated because this time the code is changed when we resolve the conflicts. It is common because we need to update the code based on the discussions usually.
17. Summary
Finally, we finish the Squash and Rebase process. Now we recap what scenarios we should use this process:
- When the master is updated and you feature branch want to use some new code in the master branch and continue to work.
- Before you want to merge your feature branch, especially there are conflicts between your branch and master branch.
For the second scenario, if you have NOT any conflict between your feat branch with the master, you can simplify this process without squash you feat branch to the feat root, because this process is used to help you resolve the conflict between your branch and master (only resolve one time, not multiple times). You can rebase your feat branch onto the master directly and configure first commit as pick and all others as squash. You will get the same result.
Git Bash
I’d like to give a quick introduction to the same process by the Git Bash. This will help you to under the git operations under the hood.
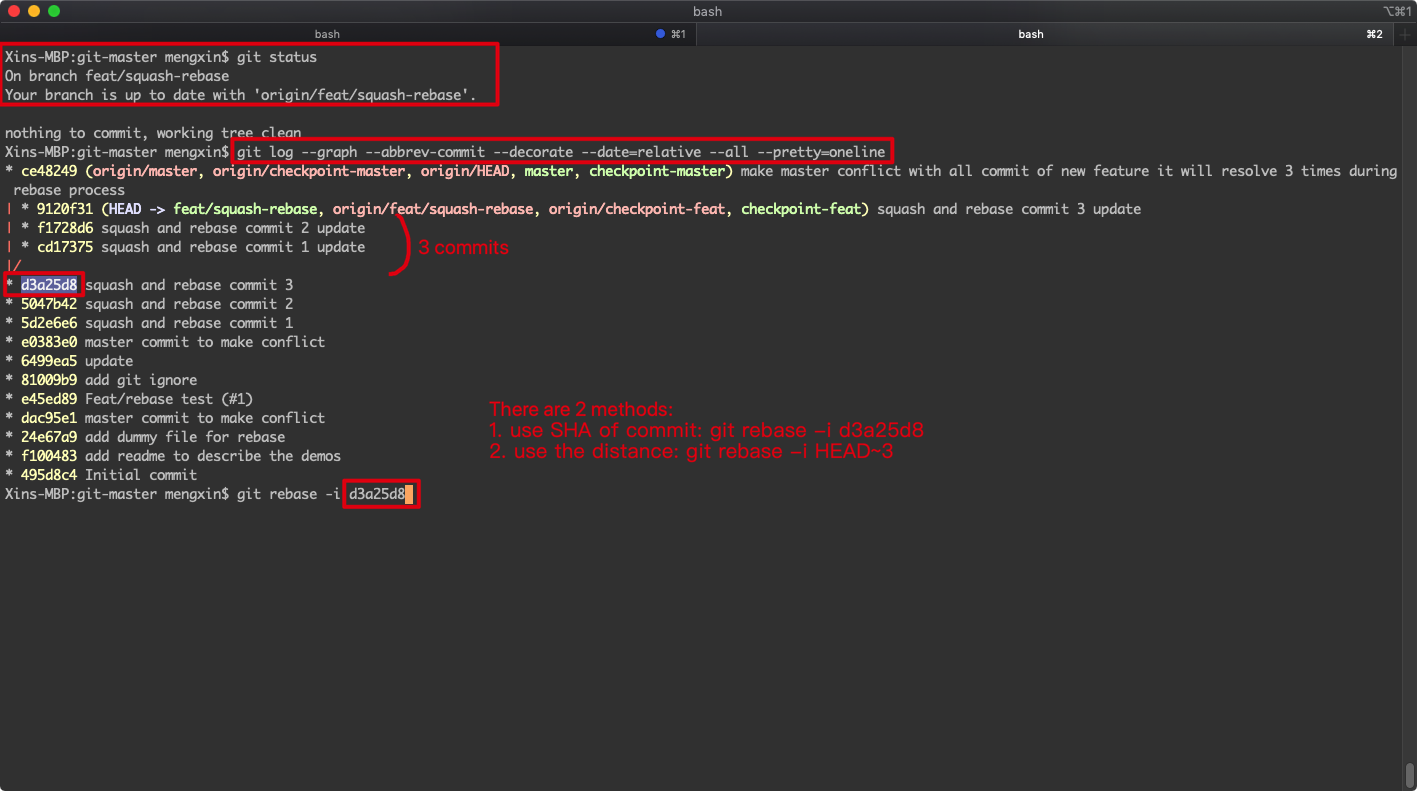
Check status and get the revision number of feat root (SHA)
Firstly, use git status to make sure the current branch is your feat branch.
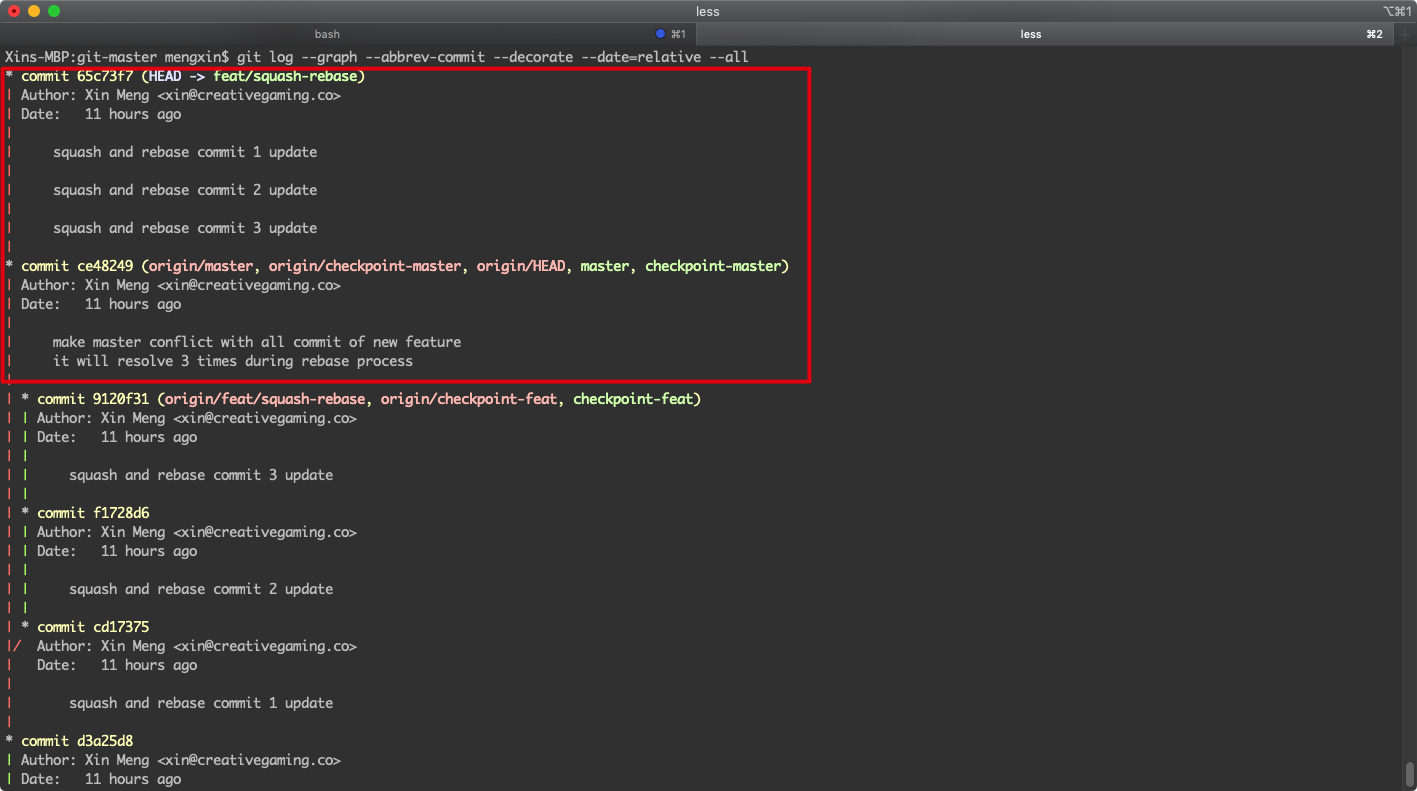
Then you can use the command below to display the overview of git log graph to find the feat root.
1 | git log --graph --abbrev-commit --decorate --date=relative --all --pretty=oneline |
Then you can use git rebase -i to start the interactive rebase with squash process. There are two methods to initial:
- use the distance of commit
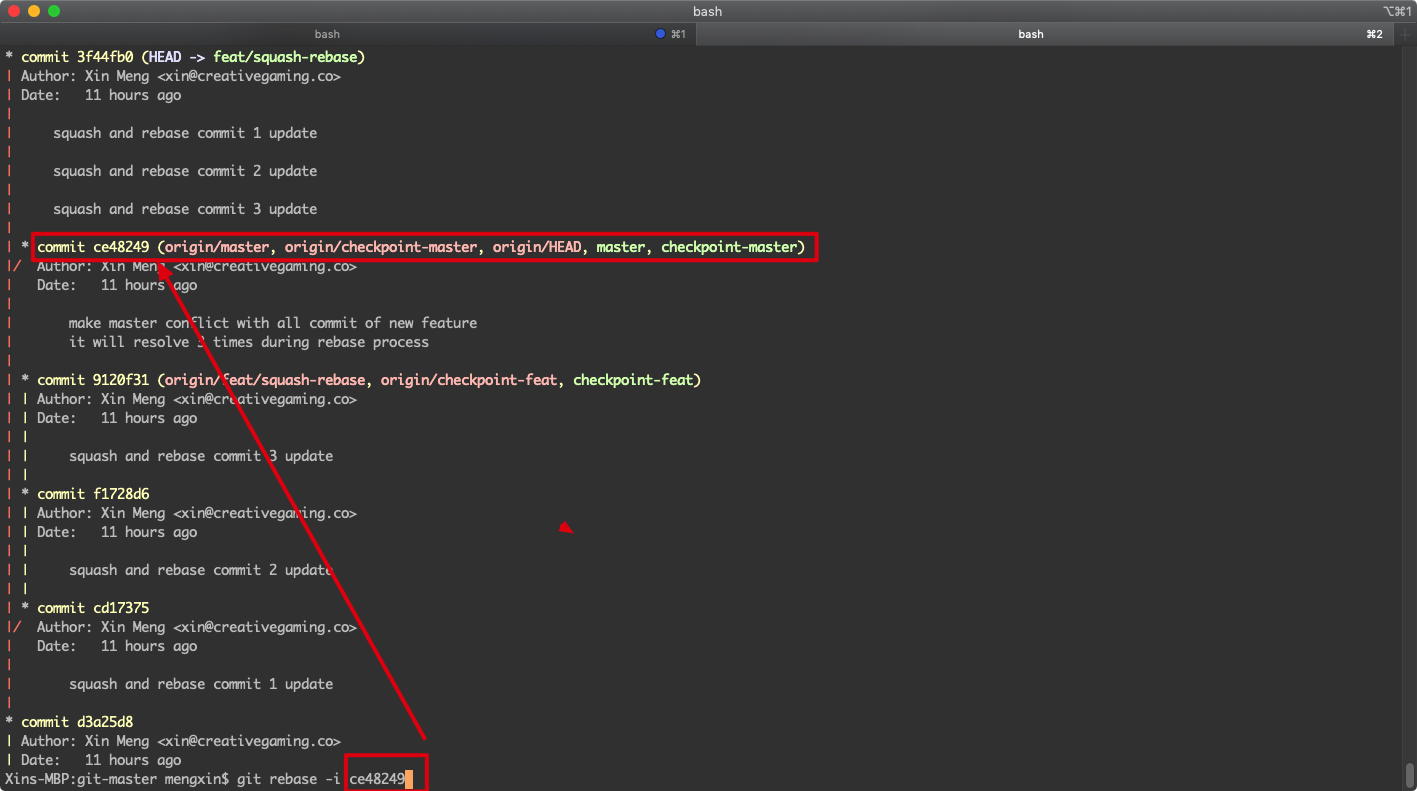
git rebase -i HEAD~3 - use the SHA of the target commit
git rebase -i d3a25d8
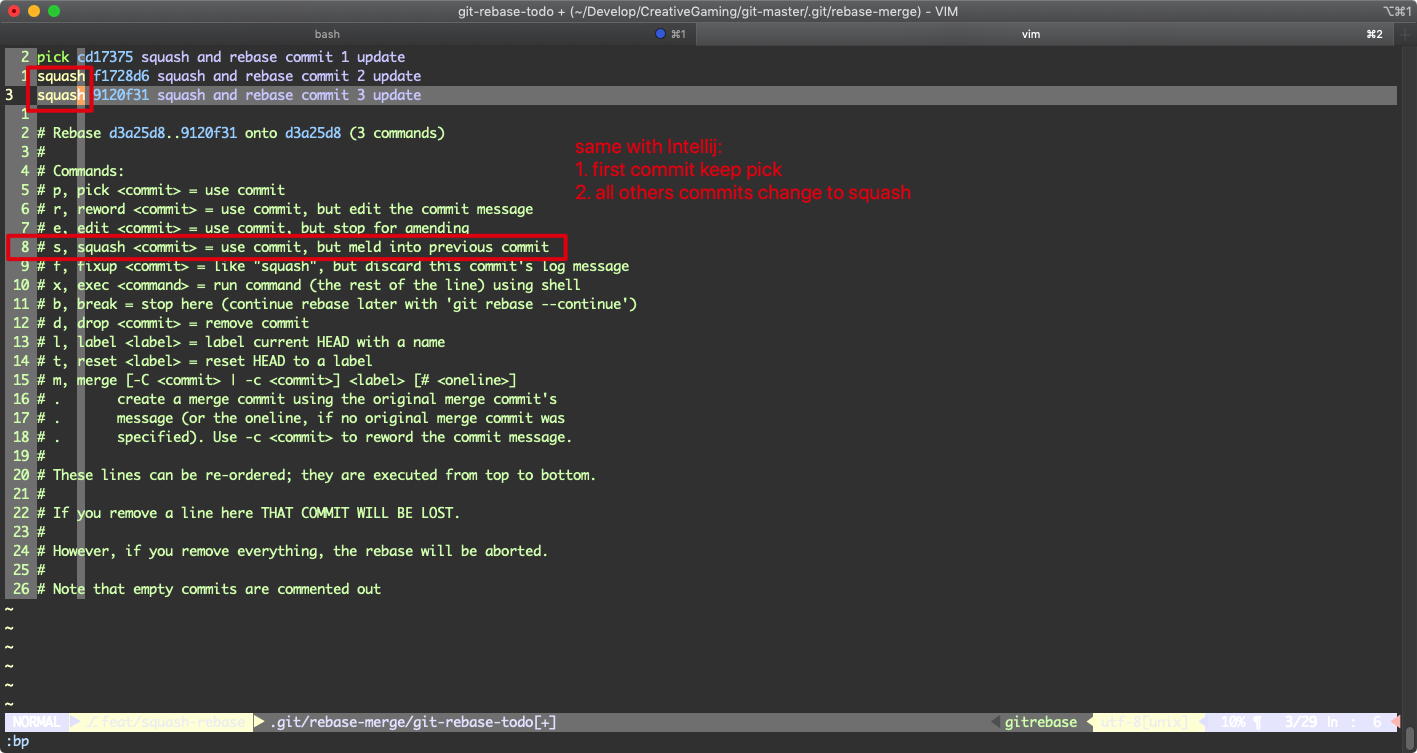
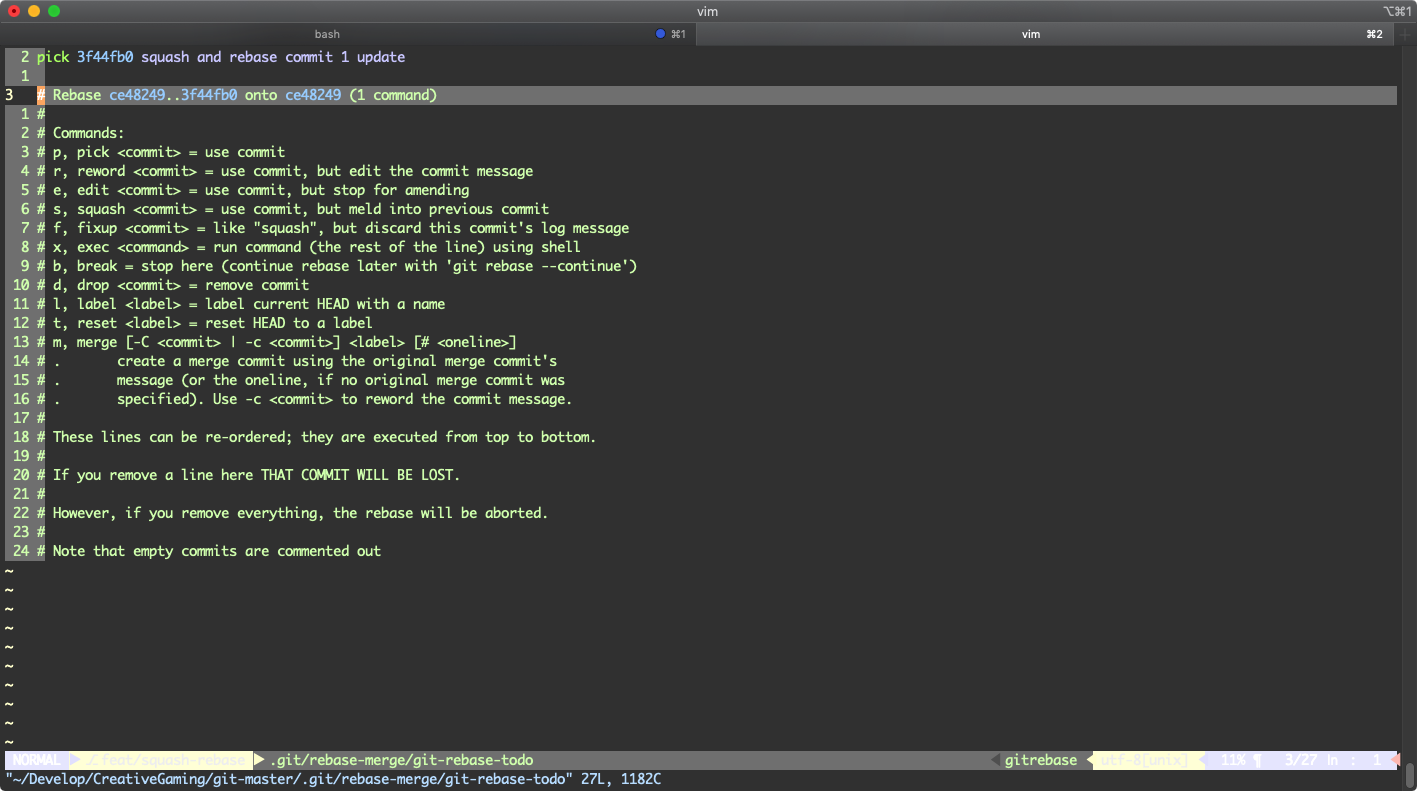
Pick and Squash
Same with Intellij, you need to config the Action for every commits in the feat branch.
This editor is Vim by default, so you should familiar with it. We update the content: keep first commit is pick and other commits change to squash.
And save and exit by Vim (Esc -> :wp -> Enter)
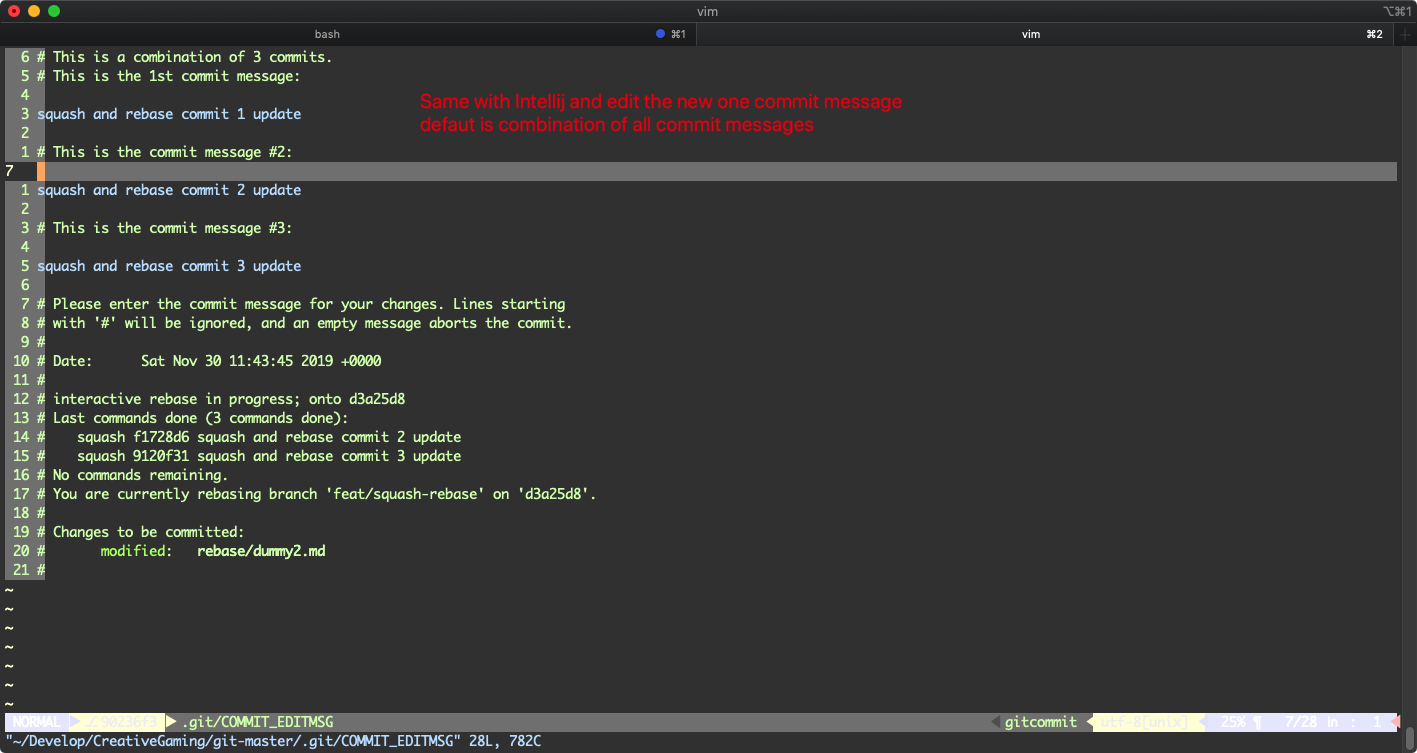
Edit the new commit message
Same with Intellij, you need to edit the new commit message, which is the combination of all commits by default.
And save and exit by Vim (Esc -> :wp -> Enter)
Rebase and Squash to feat root finish
We can check the graph again to see the new feat branch has been changed onto the feat root directly.
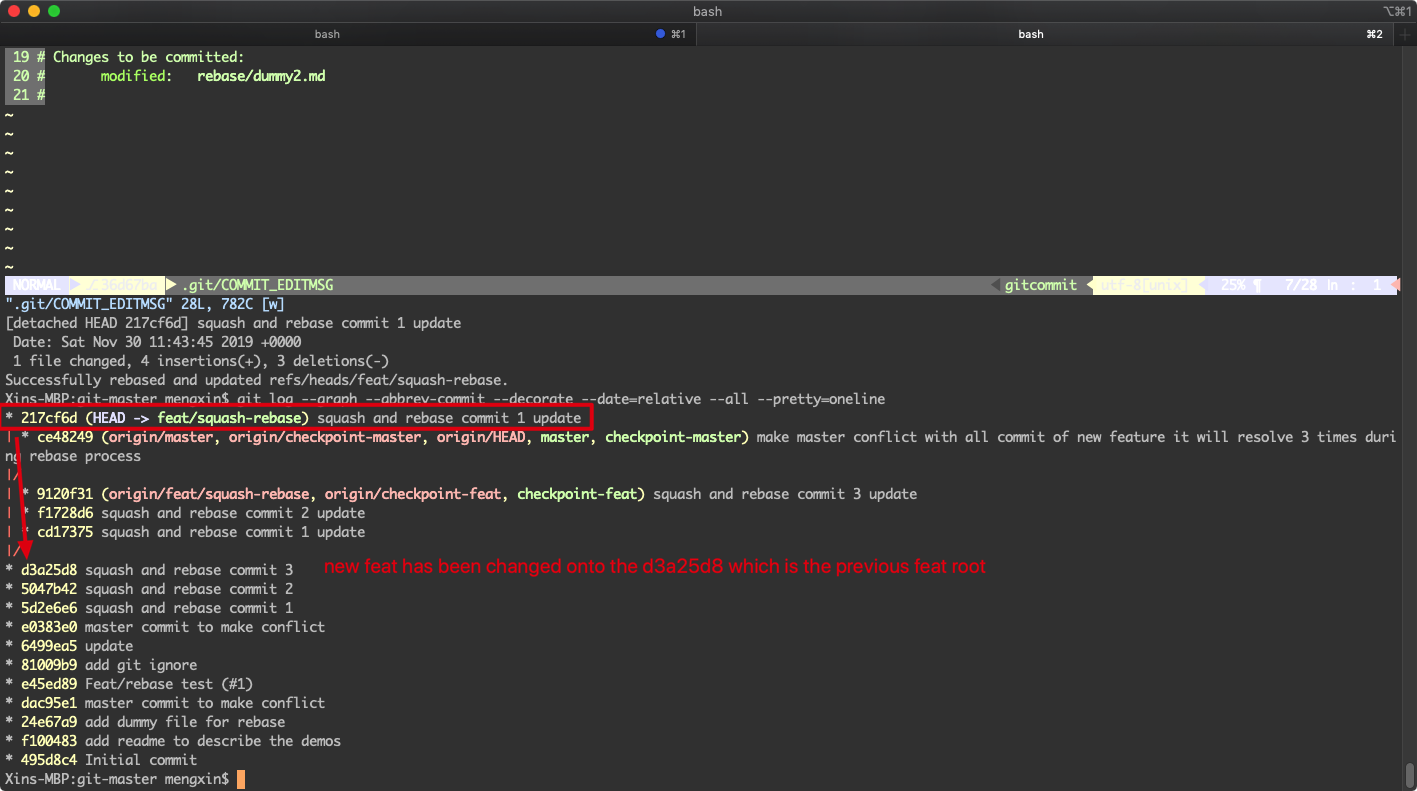
We still need force push to remote:
1 | git push --force |
Start to rebase new feat to master
We use the graph to double check current status:
And then start to rebase to the master:
Use default Pick and Squash
When you use the bash command, even there is only one commit, you also need to edit this configure. And you can just keep the default and save exit the Vim.
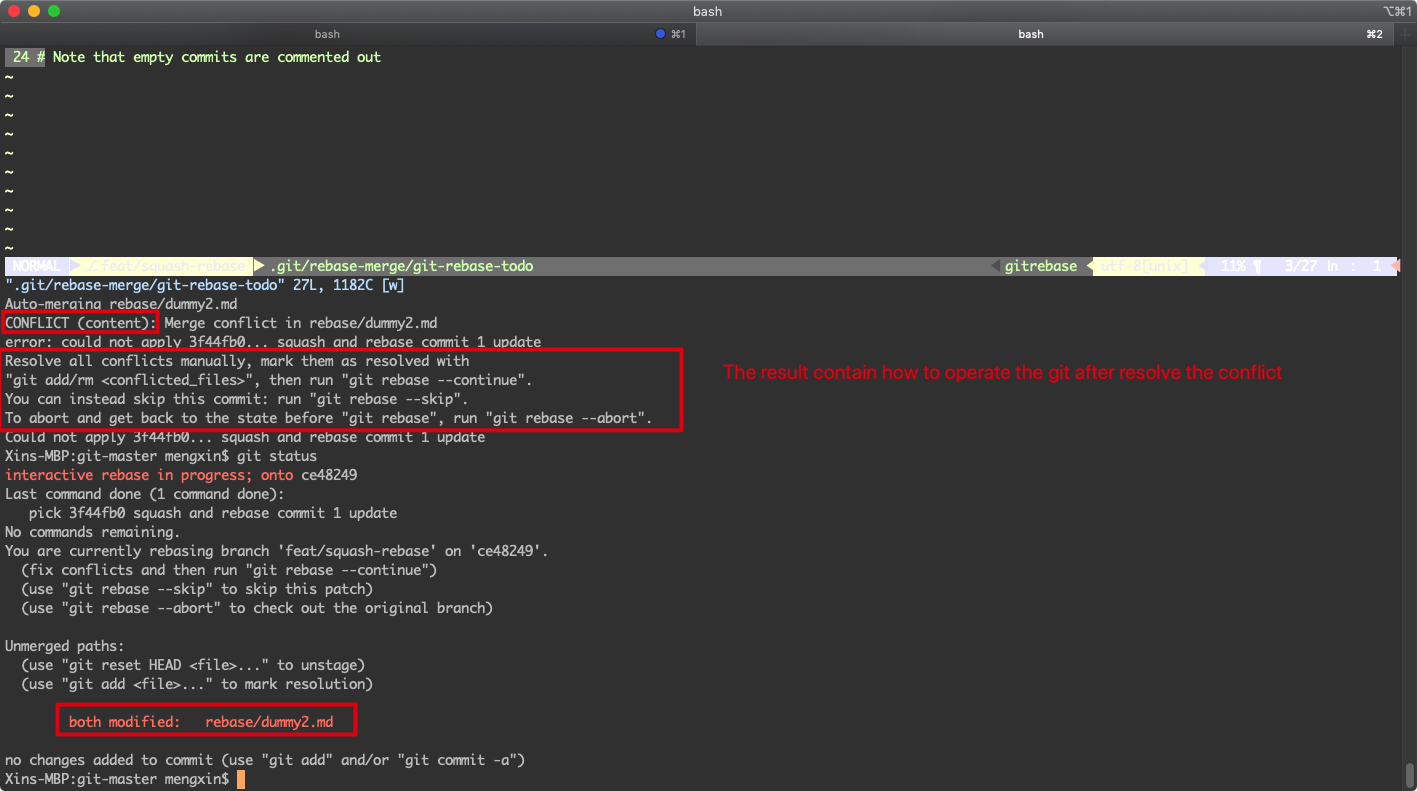
Conflicts occure
The Conflicts will be displayed on the command line:
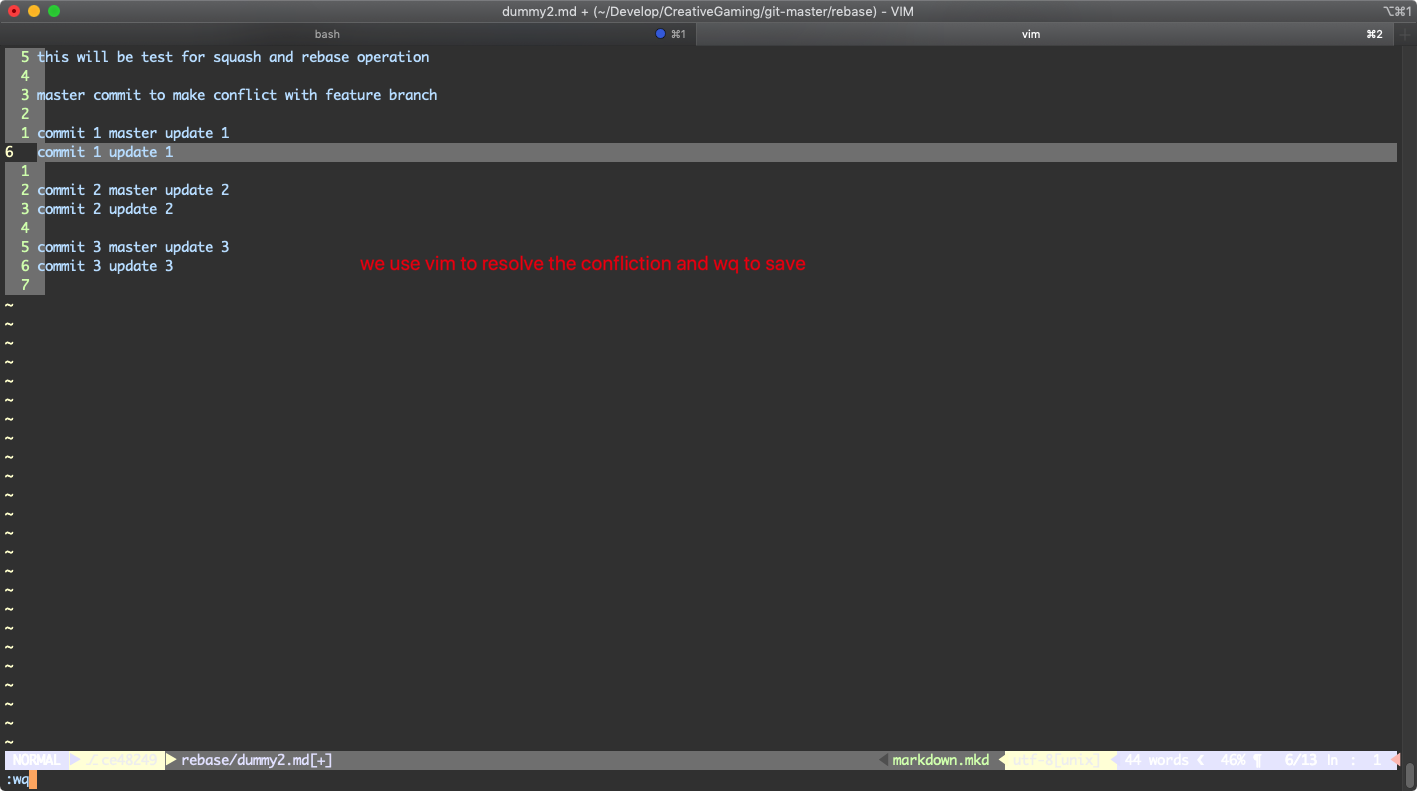
Resolve the conflicts
You need to edit the conflict file manually to resolve it. We use the Vim here to keep all the code to resolve it.
Then save and exit
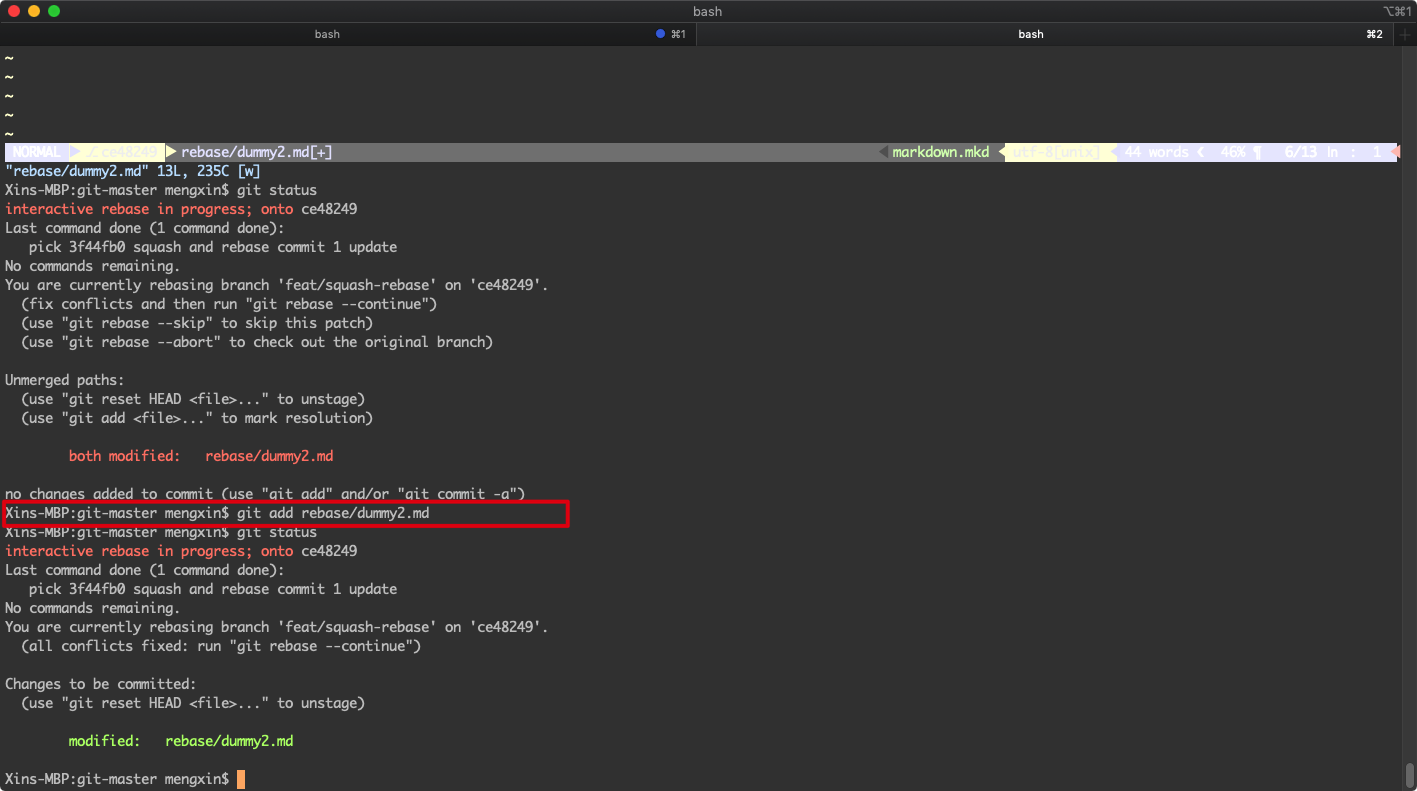
Resolve operation by the hint
You can follow the hint to operate to resolve the conflict.
1 | git add rebase/dummy2.md |
Edit the new commit message
You need to edit the new commit message:

Finish rebase onto master
You will see the feat will be rebased onto the master branch
References
- Introduction the Squash and Rebase by Git commands:
https://blog.carbonfive.com/2017/08/28/always-squash-and-rebase-your-git-commits/ - Suash and rebase into one:
https://www.internalpointers.com/post/squash-commits-into-one-git - Rebase to update PR:
https://www.digitalocean.com/community/tutorials/how-to-rebase-and-update-a-pull-request - Git rebase theory:
https://www.atlassian.com/git/tutorials/rewriting-history/git-rebase